
How to enable Secure Boot in BIOS
author: VENOEN
2025-06-20
Secure Boot is a security feature designed to prevent unauthorized software, such as malware, from loading during the computer boot process. It verifies key components during the startup process by using digital signatures to ensure that only trusted, certified software can run when the system starts. Because mini PCS are used in a wide range of applications, users may need to install various operating systems. To ensure that the installation media can be identified properly, Secure Boot is disabled by default in the BIOS.
How Secure Boot works
Digital signature verification: When the computer boots, Secure Boot checks the digital signature of the Boot Manager (such as Windows Boot Manager) and the operating system kernel. These signatures must match the database of trusted signatures stored in the firmware. Only components that pass validation can continue the startup process.
Trusted Signature Database (DB) : This database contains the digital signatures of trusted operating systems and boot managers. Secure Boot uses these signatures to verify the authenticity of the boot component.
Reject unsigned or untrusted components: If a startup component does not have a valid signature or the signature is not in a trusted database, Secure Boot prevents the component from executing, thereby preventing potential malware or unauthorized operating system loading.
The main functions of Secure Boot
Enhanced system security: Secure Boot reduces the risk of infections and attacks by preventing malware from loading at system startup, especially against low-level system attacks such as rootkits.
Prevent unauthorized operating system booting: By verifying the signature of the Boot manager and operating system kernel, Secure Boot ensures that only trusted operating systems can boot, preventing systems from being tampered with or replaced.
Protect system integrity: Secure Boot helps maintain system integrity and ensures that your computer's boot environment is secure and trusted. If any unauthorized changes are detected, it prevents the system from continuing to boot.
Enable and disable
Enable: Secure Boot is usually enabled in BIOS or UEFI Settings. For users using modern operating systems, such as Windows 10 or 11, enabling Secure Boot can provide additional security.
Disable: In some cases, such as installing an unofficial operating system or using unsigned drivers, Secure Boot may need to be temporarily disabled to allow the software to run.
compatibility
Windows: Windows 8 and later oss support Secure Boot by default, and Windows 11 requires the OS to run on a Secure Boot enabled system.
Linux: Many modern Linux distributions also support Secure Boot, although additional configuration may be required to allow the system to boot properly.
PS: Mini PCS are used in a wide range of applications, and users usually need to install various system versions. To ensure compatibility, Secure Boot in BIOS is disabled by default before delivery. To enable this function, perform the following steps:
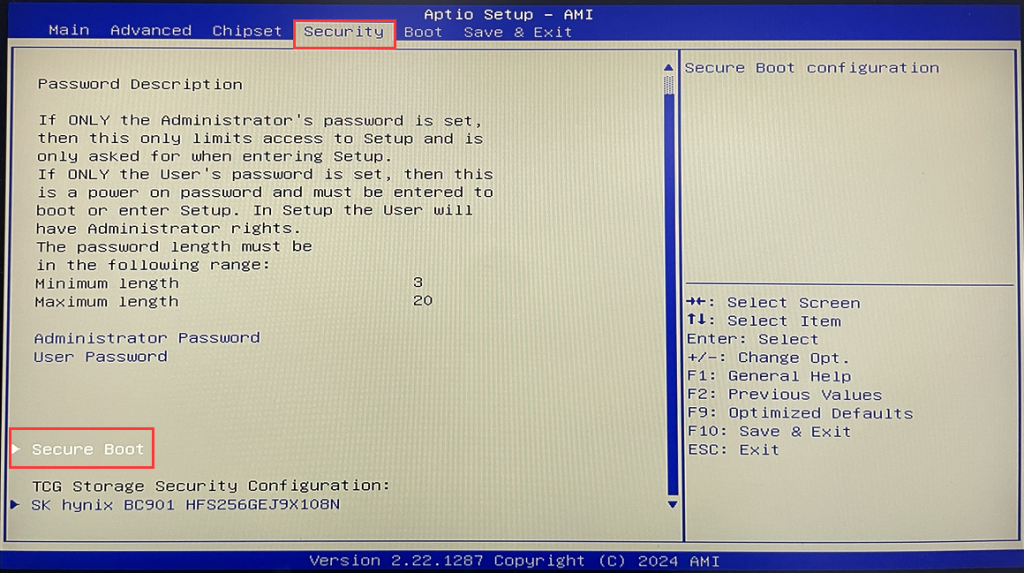
Step 1 Press the SW button and press Del on the keyboard to go to BIOS Setup.
Step 2: After entering the BIOS, choose Security>Security Boot> Set Security Boot to [Enabled].
PS: If the system displays a message indicating that the configuration conditions are not met, configure related parameters in the BIOS as prompted and open the page again.
Digital signature verification: When the computer boots, Secure Boot checks the digital signature of the Boot Manager (such as Windows Boot Manager) and the operating system kernel. These signatures must match the database of trusted signatures stored in the firmware. Only components that pass validation can continue the startup process.
Trusted Signature Database (DB) : This database contains the digital signatures of trusted operating systems and boot managers. Secure Boot uses these signatures to verify the authenticity of the boot component.
Reject unsigned or untrusted components: If a startup component does not have a valid signature or the signature is not in a trusted database, Secure Boot prevents the component from executing, thereby preventing potential malware or unauthorized operating system loading.
The main functions of Secure Boot
Enhanced system security: Secure Boot reduces the risk of infections and attacks by preventing malware from loading at system startup, especially against low-level system attacks such as rootkits.
Prevent unauthorized operating system booting: By verifying the signature of the Boot manager and operating system kernel, Secure Boot ensures that only trusted operating systems can boot, preventing systems from being tampered with or replaced.
Protect system integrity: Secure Boot helps maintain system integrity and ensures that your computer's boot environment is secure and trusted. If any unauthorized changes are detected, it prevents the system from continuing to boot.
Enable and disable
Enable: Secure Boot is usually enabled in BIOS or UEFI Settings. For users using modern operating systems, such as Windows 10 or 11, enabling Secure Boot can provide additional security.
Disable: In some cases, such as installing an unofficial operating system or using unsigned drivers, Secure Boot may need to be temporarily disabled to allow the software to run.
compatibility
Windows: Windows 8 and later oss support Secure Boot by default, and Windows 11 requires the OS to run on a Secure Boot enabled system.
Linux: Many modern Linux distributions also support Secure Boot, although additional configuration may be required to allow the system to boot properly.
PS: Mini PCS are used in a wide range of applications, and users usually need to install various system versions. To ensure compatibility, Secure Boot in BIOS is disabled by default before delivery. To enable this function, perform the following steps:
Step 1 Press the SW button and press Del on the keyboard to go to BIOS Setup.
Step 2: After entering the BIOS, choose Security>Security Boot> Set Security Boot to [Enabled].
PS: If the system displays a message indicating that the configuration conditions are not met, configure related parameters in the BIOS as prompted and open the page again.
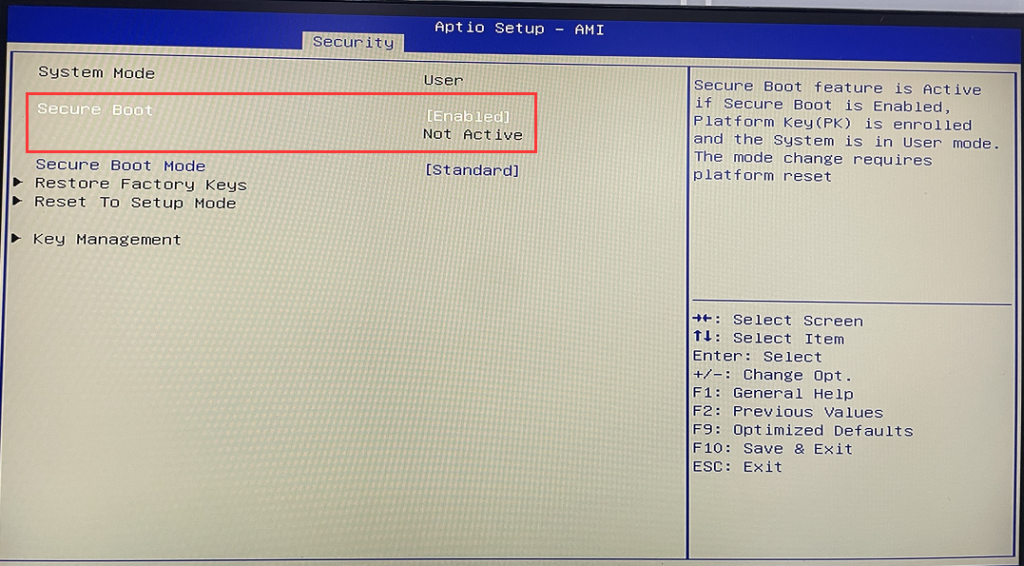
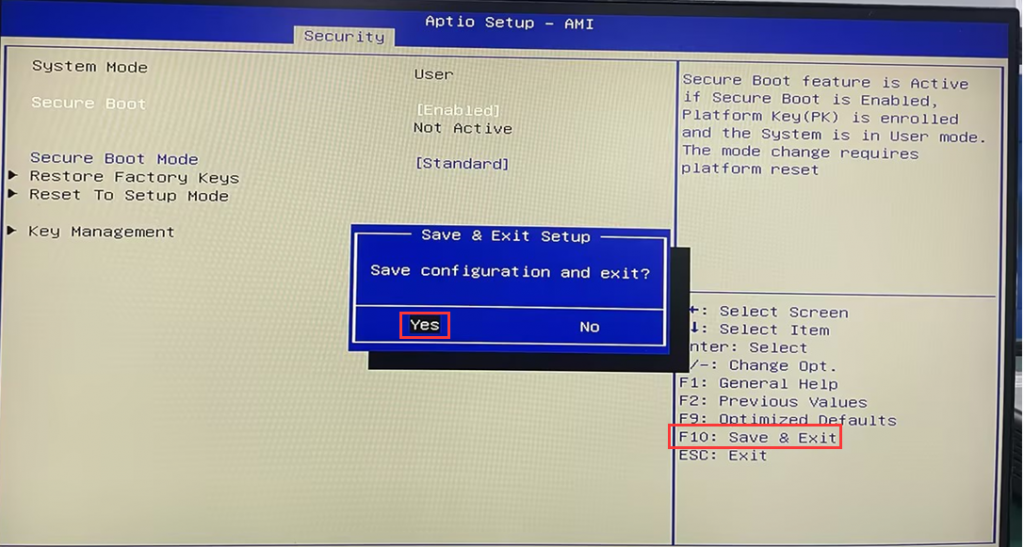
- Step 3: Press F10 to save the configuration and exit.
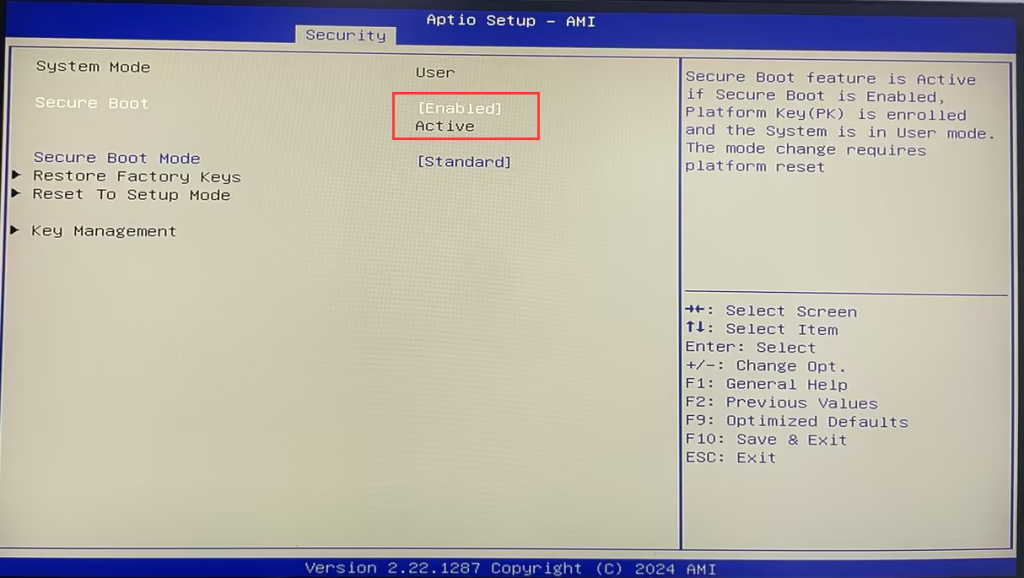
- Step 4: When the computer restarts and the startup LOGO is displayed, press the Del key to enter the BIOS. On the Secure Boot page, check whether Secure Boot is successfully enabled.
The computer automatically enters the BIOS page when it boots up, but cannot enter the operating system. Troubleshooting steps
HBCD_PE_x64 maintenance tool production and usage
