
The possible reasons and solutions for the mini computer not displaying when it is powered on
author: VENOEN
2025-08-14
Minicomputer power-on does not show possible causes and solutions
Fault symptom description:
After the mini mainframe is powered on, the display always remains in a black screen state, without any image display, the indicator light on the small mainframe is lit, but the screen has no response.
The situation that the display is always black after the mini host is powered on May be caused by a variety of reasons. The following are possible causes and corresponding solutions, please follow the steps to troubleshoot:
Step 1: Monitor and cable problems
Check the monitor power supply and signal source: Ensure that the monitor is powered on, observe the power indicator is normal, and ensure that the correct signal source input is configured.
Check the video cable: Ensure that the video cable (such as HDMI, DisplayPort, VGA, and Type-c) is securely connected and not loose or damaged.
Replace the monitor or cable: Try using a different monitor and cable to troubleshoot problems with the monitor or cable.
Tips: Most models (such as M1, M3, M5, M9, etc.) of the DP, Type-C ports, do not support the use of other conversion data cable connection (such as: DP-HDMI, DP-DVI, Type-C-HDMI, Type-c-DP, etc.), the use of such conversion cables may cause the display to be unable to receive signals from the computer, and the display will report no video input and other prompts! We recommend that you use data cables such as DP-DP or type-c type-c to check directly with the display. If your display does not have DP, type-c such video ports, please do not worry, you can contact our dedicated customer service staff for help, our company will provide active (with conversion chip) DP-HDMI and Type-C-HDMI data cable for you to buy, you will solve the problem.
Step 2: The BIOS/UEFI configuration is faulty
Cause: The BIOS/UEFI Settings are incorrect. As a result, the BIOS/UEFI cannot be started or displayed properly.
Solution:
Try to reset BIOS/UEFI Settings. Some motherboards are designed to recover CMOS pins with one click (such as H4, H4T, K4 and other models), can short-circuit the JCMOS check on the motherboard in the state of power failure 5-10 seconds to restore the CMOS default value, such as the motherboard is not designed to recover CMOS pins, usually by removing the CMOS battery or battery connection line on the motherboard for a few minutes. Then reinstall to implement.
Step 1: Monitor and cable problems
Check the monitor power supply and signal source: Ensure that the monitor is powered on, observe the power indicator is normal, and ensure that the correct signal source input is configured.
Check the video cable: Ensure that the video cable (such as HDMI, DisplayPort, VGA, and Type-c) is securely connected and not loose or damaged.
Replace the monitor or cable: Try using a different monitor and cable to troubleshoot problems with the monitor or cable.
Tips: Most models (such as M1, M3, M5, M9, etc.) of the DP, Type-C ports, do not support the use of other conversion data cable connection (such as: DP-HDMI, DP-DVI, Type-C-HDMI, Type-c-DP, etc.), the use of such conversion cables may cause the display to be unable to receive signals from the computer, and the display will report no video input and other prompts! We recommend that you use data cables such as DP-DP or type-c type-c to check directly with the display. If your display does not have DP, type-c such video ports, please do not worry, you can contact our dedicated customer service staff for help, our company will provide active (with conversion chip) DP-HDMI and Type-C-HDMI data cable for you to buy, you will solve the problem.
Step 2: The BIOS/UEFI configuration is faulty
Cause: The BIOS/UEFI Settings are incorrect. As a result, the BIOS/UEFI cannot be started or displayed properly.
Solution:
Try to reset BIOS/UEFI Settings. Some motherboards are designed to recover CMOS pins with one click (such as H4, H4T, K4 and other models), can short-circuit the JCMOS check on the motherboard in the state of power failure 5-10 seconds to restore the CMOS default value, such as the motherboard is not designed to recover CMOS pins, usually by removing the CMOS battery or battery connection line on the motherboard for a few minutes. Then reinstall to implement.

Step 3: Power supply problem: The power supply is unstable or insufficient.
Use a multimeter or other tool to check whether the output voltage of the power adapter is stable. Usually, the output voltage of the power adapter is 12V or 19V. You can also replace the matched power adapter.
Step 4: The memory (RAM) is abnormal
Try to disassemble the machine in the state of power failure, usually open the bottom 4 screws of the chassis to see the inside of the chassis;
Remove the memory module from the mainboard, and wipe the gold finger of the memory module with an eraser to remove the oxide layer on the gold finger. Then install the memory module again and start the test.
For example, if two memory modules are installed on the computer, remove one memory module and start the computer. Use this method to test whether all memory modules are abnormal.
If you have a confirmed normal and matched memory module, you can replace the confirmed normal memory module test.
Tips: Memory may be incompatible with the motherboard, usually we recommend the use of brand memory (such as: Samsung, hynix: SK hynix, Micron: Micron, Kingston: Kingston) test, the compatibility of this kind of brand memory is relatively better.
Step 5: The graphics card (GPU) is loose or abnormal
Connect the wired keyboard and make sure it has Num Lock and Caps Lock indicators;
Press the SW button to start the mini computer, wait 1-2 minutes and press the Num Lock and Caps Lock keys, and observe whether the corresponding indicator light is steady on or off. If the corresponding indicator light can be steady on or off, it indicates that the motherboard has passed the self-test, such as the display has no video input and the display and data cable are excluded. The graphics card (GPU) may be loose or damaged.
For independent graphics card models and confirm that the graphics card is detachable (such as GT full series models), you can follow this step:
Disassemble the machine when the power is off;
Remove the independent graphics card (GPU), and wipe the gold finger part of the memory strip with an eraser to remove the oxide layer on the gold finger. Install the independent graphics card (GPU) again and start the test;
If you have a matching independent graphics card (GPU), you can also replace the normal independent graphics card after testing;
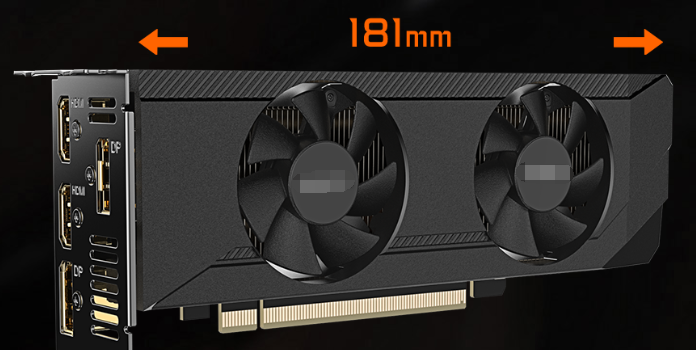
Graphics card size:
L=181 W=69 H=36 mm
Use a multimeter or other tool to check whether the output voltage of the power adapter is stable. Usually, the output voltage of the power adapter is 12V or 19V. You can also replace the matched power adapter.
Step 4: The memory (RAM) is abnormal
Try to disassemble the machine in the state of power failure, usually open the bottom 4 screws of the chassis to see the inside of the chassis;
Remove the memory module from the mainboard, and wipe the gold finger of the memory module with an eraser to remove the oxide layer on the gold finger. Then install the memory module again and start the test.
For example, if two memory modules are installed on the computer, remove one memory module and start the computer. Use this method to test whether all memory modules are abnormal.
If you have a confirmed normal and matched memory module, you can replace the confirmed normal memory module test.
Tips: Memory may be incompatible with the motherboard, usually we recommend the use of brand memory (such as: Samsung, hynix: SK hynix, Micron: Micron, Kingston: Kingston) test, the compatibility of this kind of brand memory is relatively better.
Step 5: The graphics card (GPU) is loose or abnormal
Connect the wired keyboard and make sure it has Num Lock and Caps Lock indicators;
Press the SW button to start the mini computer, wait 1-2 minutes and press the Num Lock and Caps Lock keys, and observe whether the corresponding indicator light is steady on or off. If the corresponding indicator light can be steady on or off, it indicates that the motherboard has passed the self-test, such as the display has no video input and the display and data cable are excluded. The graphics card (GPU) may be loose or damaged.
For independent graphics card models and confirm that the graphics card is detachable (such as GT full series models), you can follow this step:
Disassemble the machine when the power is off;
Remove the independent graphics card (GPU), and wipe the gold finger part of the memory strip with an eraser to remove the oxide layer on the gold finger. Install the independent graphics card (GPU) again and start the test;
If you have a matching independent graphics card (GPU), you can also replace the normal independent graphics card after testing;
Graphics card size:
L=181 W=69 H=36 mm
GT-12th and 13th generation mobile terminal Auto Power on configuration steps
Mini PC nothing happens when pressing SW and the computer does not turn on. Solution
