
Windows 7 Installation Guide
Windows 7 Installation Guide
Table of Contents
- Preparation: Download Image & Tools
- Create Bootable USB Drive (Rufus)
- Boot from USB Drive and Enter Installation Interface
- Install System via Wizard
- Install Drivers
- Activate System
| Item | Description |
|---|---|
| Installation Target | Windows 7 PRO |
| Preparation | 1 USB flash drive (8 GB or larger), 1 internet-connected computer (for downloading & media creation) |
| Required Tools | Windows 7 system image (ISO), Rufus image writing tool |
| Estimated Time | About 20–30 minutes (excluding image download time) |
| Document Version | V1.0 (2026-09) |
1. Pre-Installation Notes
1.1 Overview
- Prerequisite: You already have a working target host, plus a separate computer for downloading and creating the bootable media.
- This guide follows 5 sequential steps: download image → create USB drive → install OS → install drivers → activate system. Follow the steps in order.
Notice: This guide assumes you are installing on a brand-new host, or all data on the old host has been backed up. If there are important files on the host disk, back them up first before proceeding!
1.2 Understand 3 core concepts
① Bootable USB Drive: Write the system image onto a USB drive, turning it into a bootable "system installation disc". During installation, the host boots from the USB instead of the hard drive. ② Installation erases data: A clean install deletes and rebuilds all selected disk partitions. Confirm no important files remain on the target disk in advance. ③ Verify hardware compatibility: Consult your hardware supplier/support team to confirm whether the hardware platform supports Windows 7 installation.
2. Preparation: Download Image & Tools
2.1 Required Materials
| Material | Quantity | Purpose | Remarks |
|---|---|---|---|
| USB Flash Drive | 1 piece (8 GB or larger) | Create system boot media | Will be formatted during creation; do not store important files. USB 3.0 offers faster writing speed. |
| Internet-connected Computer | 1 piece | Download image and create bootable USB | Windows / macOS supported |
| Windows 7 Image | 1 piece (~2.4GB ~ 3GB) | System installation source | ISO file from image website |
| Rufus Tool | 1 piece (Free) | Write image to USB drive | Portable software, no installation required |
| Target Host | 1 piece | Machine to install the OS | Supports UEFI and Legacy boot recommended |
2.2 Download Windows 7 System Image
- Open the image download page (copy the link directly to your browser address bar): //massgrave.dev/windows_7_links
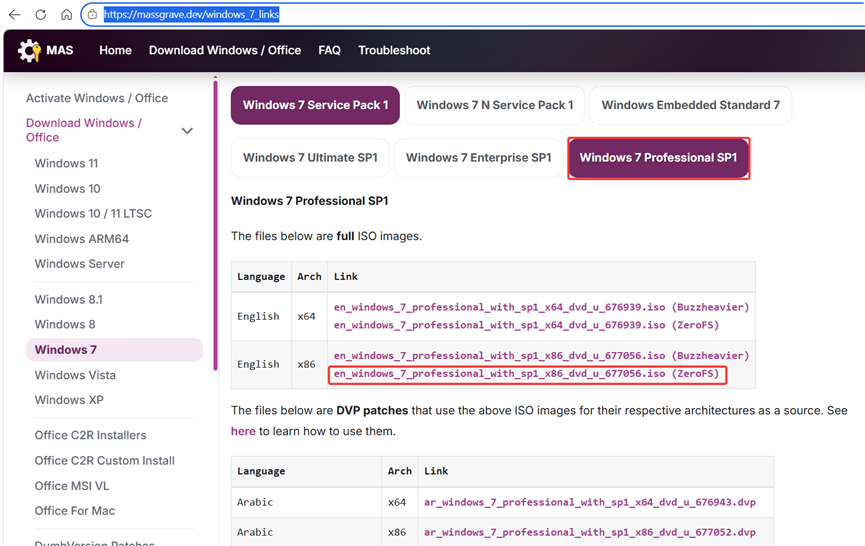
2. Locate the Windows 7 download entry on the page and click to go to the download page.
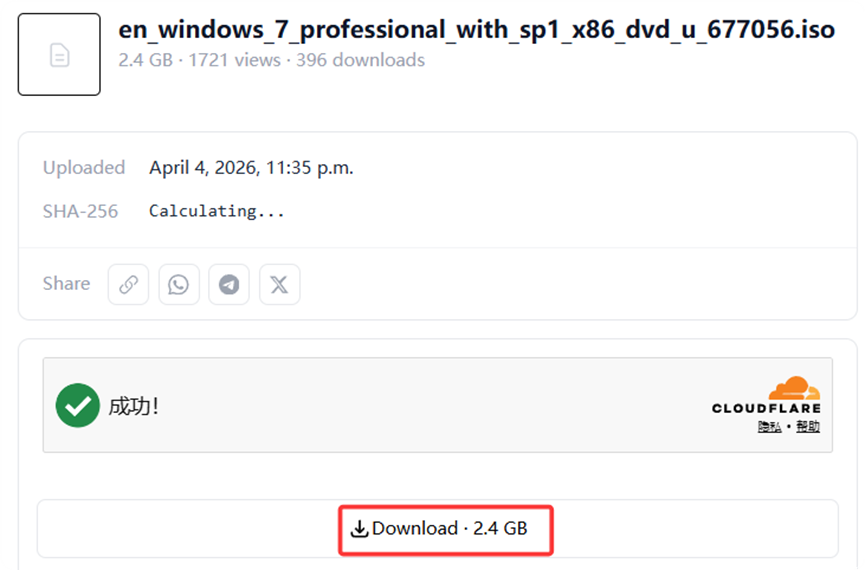
3. Select the version and language on the download page, then start downloading and wait for completion (this guide uses en_windows_7_professional_with_sp1_x86 as an example).
2.3 Download Rufus Writing Tool
- Open Rufus official website: //rufus.ie/en
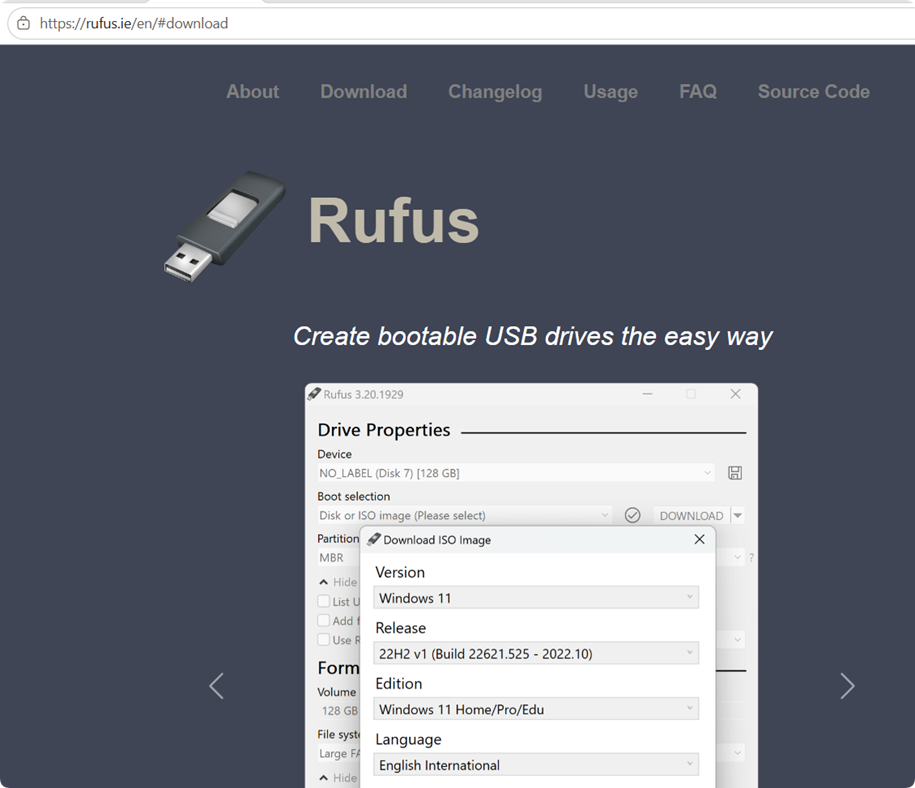
2. Click the Download button at the top of the page to get the latest Rufus version (e.g. rufus-4.x.exe, free and open-source).
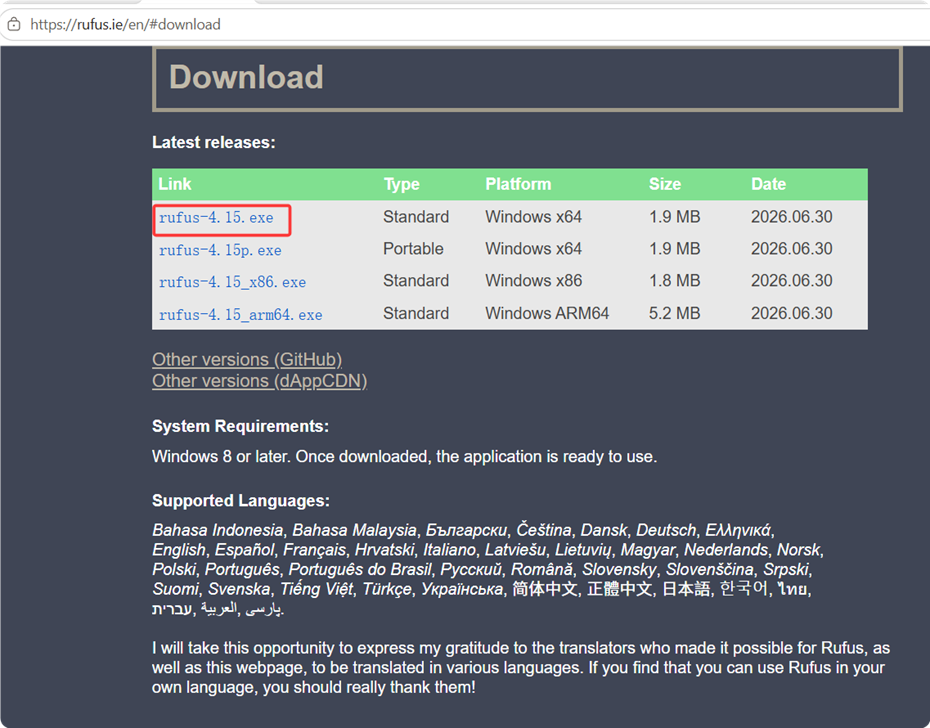
3. Double-click the downloaded .exe file. Rufus requires no installation; the main interface opens directly.
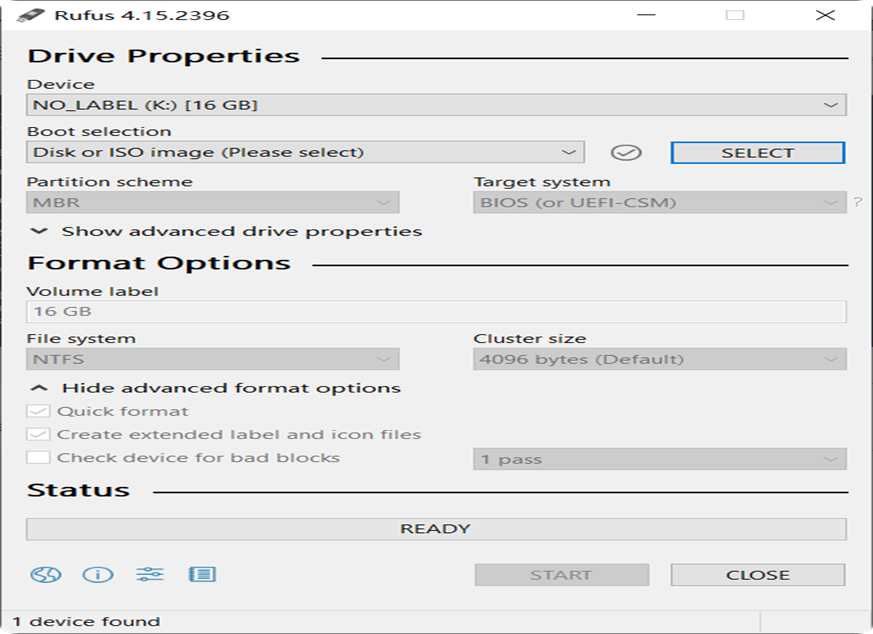
3. Step 1: Create Bootable System USB Drive (Rufus)
WARNING: This step formats the USB drive and deletes all data stored on it. Confirm no important files are saved on the USB before proceeding!
3.1 Select USB Drive and Image
- Plug the USB drive into your computer USB port and launch Rufus.
- In the "Device" dropdown box, select your USB drive (identify it by capacity and drive letter, do not select the wrong device).
- On the right side of "Boot selection", click "Select" and pick the downloaded windows 7 PRO.iso image file. After selection, Rufus will auto-recognize and display en_Windows_7_Professional.
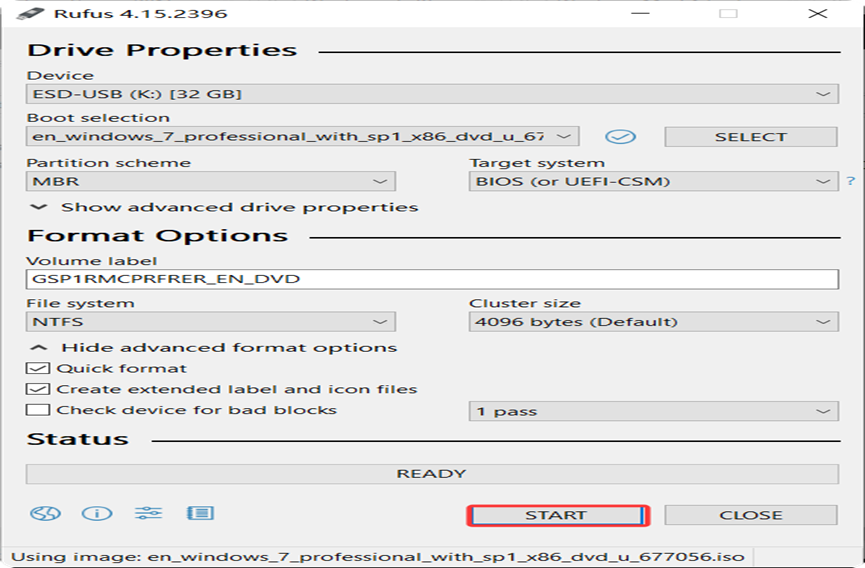
4. Leave "Partition scheme" and "Target system" as default: MBR (BIOS or UEFI-CSM). Keep all other options unchanged.
5. Click the "START" button at the bottom.
3.2 Confirm Writing and Wait for Completion
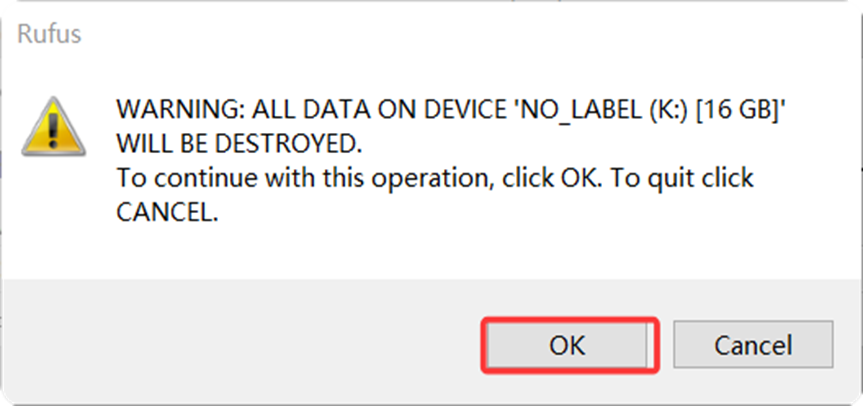
- When the warning "All data on the USB will be destroyed" appears, click "OK".
2. Wait for the progress bar to finish, changing colour from orange to green. When status shows "READY", writing is completed.
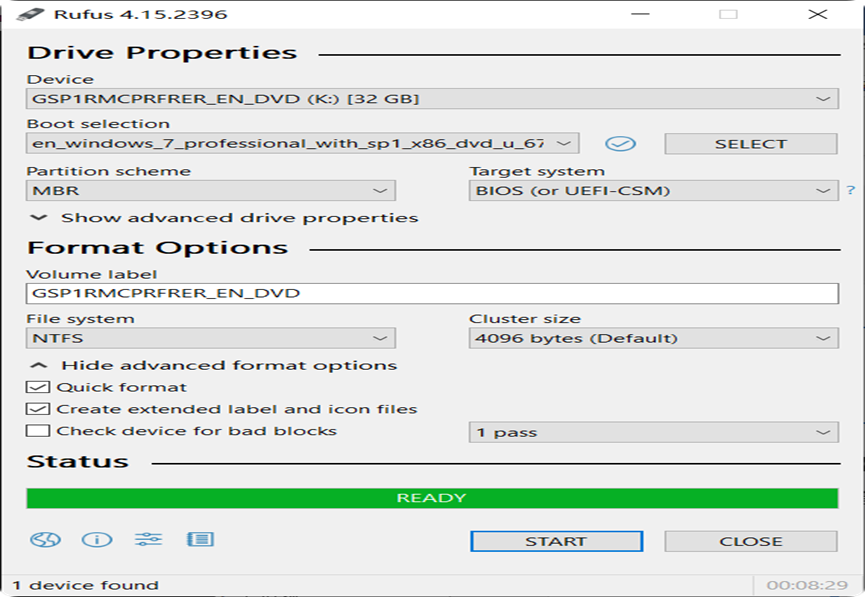
3. Safely eject the USB drive via the "Safely remove hardware" icon on the system taskbar. The bootable USB is now ready.
Notice: The visible capacity of the USB drive will shrink after creation. This is normal and confirms the image has been written successfully. To restore the USB as a regular storage drive later, reformat it in Disk Management.
4. Step 2: Boot from USB and Enter Installation Interface
4.1 Insert USB and Press Hotkey to Open Boot Menu
- Plug the newly created bootable USB into the target host USB port (rear USB ports on the host are recommended for better compatibility).
- Power on the host. Immediately and repeatedly tap F11 / F7 on the keyboard (tap continuously, do not hold down).
- Stop pressing keys once the Boot Menu appears. If the machine boots directly into an OS or shows a black screen, the timing was missed. Reboot and try again quickly.
4.2 Select USB Drive in Boot Menu
- In the Boot Menu, use the up/down arrow keys to locate the USB drive name option, for example: AI Mass Storage
- Select the entry and press Enter. The host will boot from the USB drive.
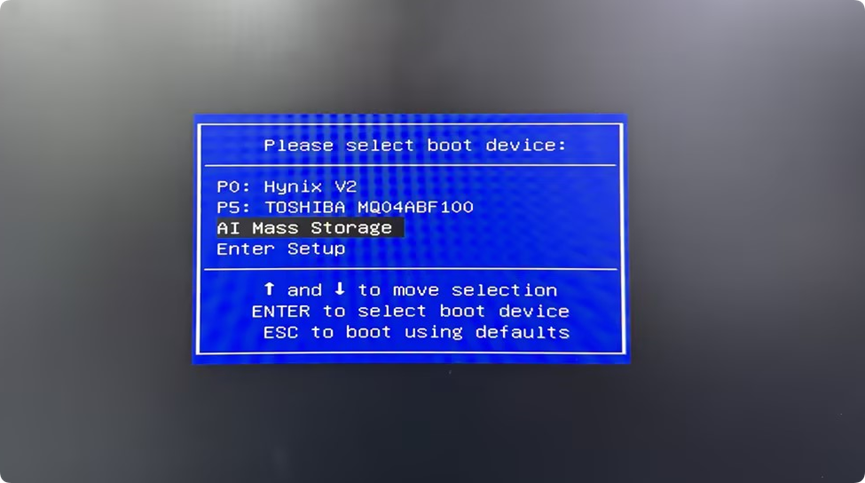
3.Shortly after, the blue "Windows Setup" loading screen will appear. This means boot success and you can proceed to the installation wizard.
5. Step 3: Install OS via Wizard
5.1 Language Settings and Start Installation
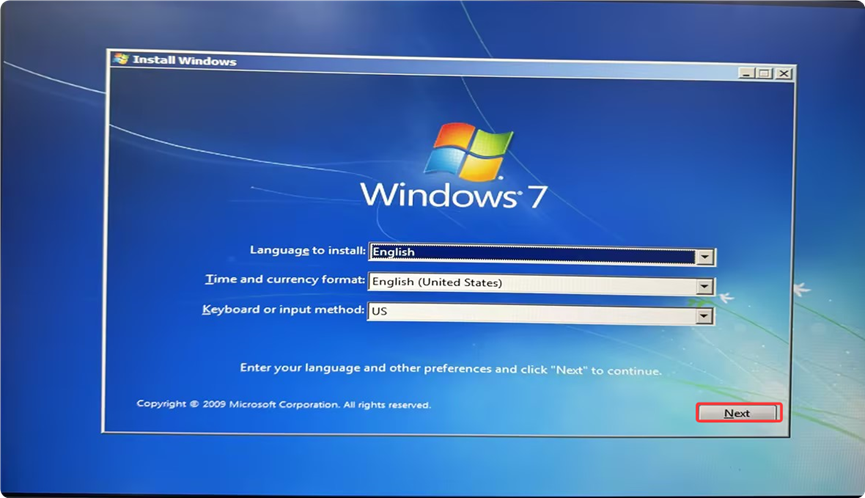
- On the welcome screen of Windows Setup, leave language, time and keyboard input method as default "English", then click "Next".
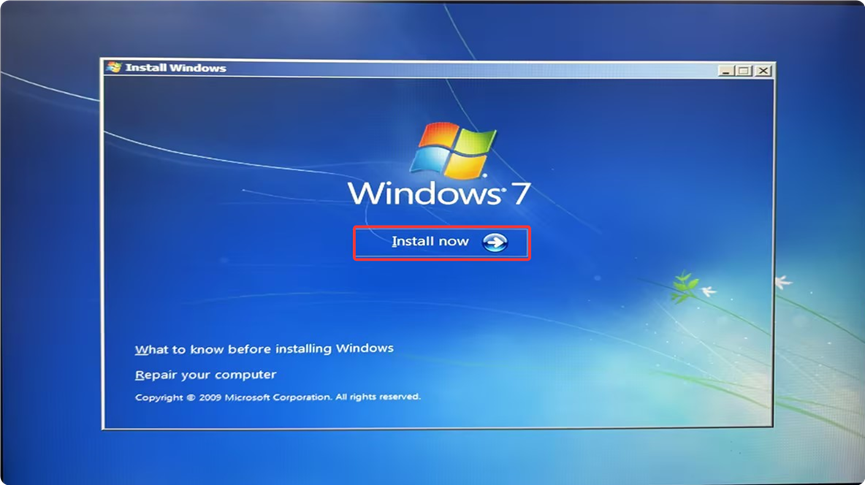
2. Click "Install now".
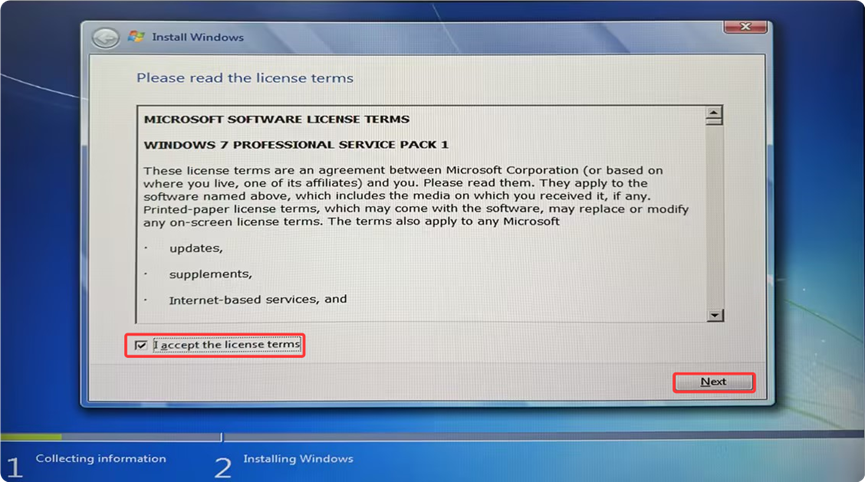
3.Tick "I accept the license terms" and click "Next".
5.2 Select Installation Type
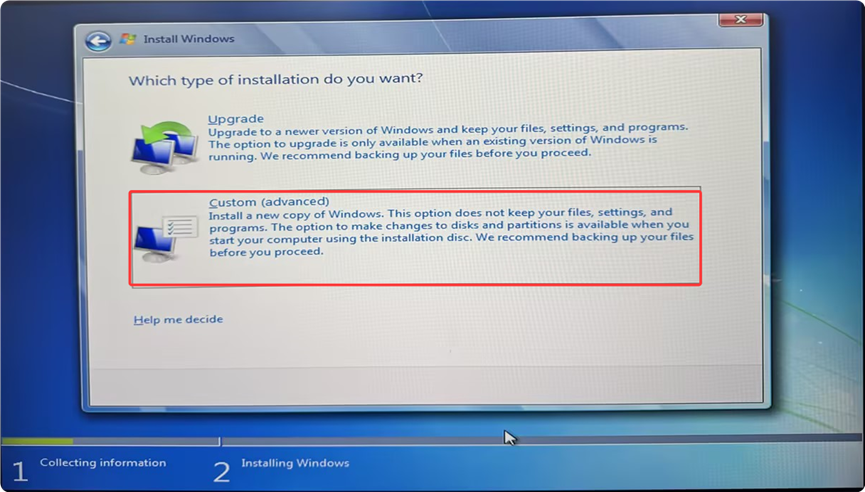
- On the page "Which type of installation do you want?", select "Custom (advanced)".
5.3 Disk Partitioning (Critical Step)
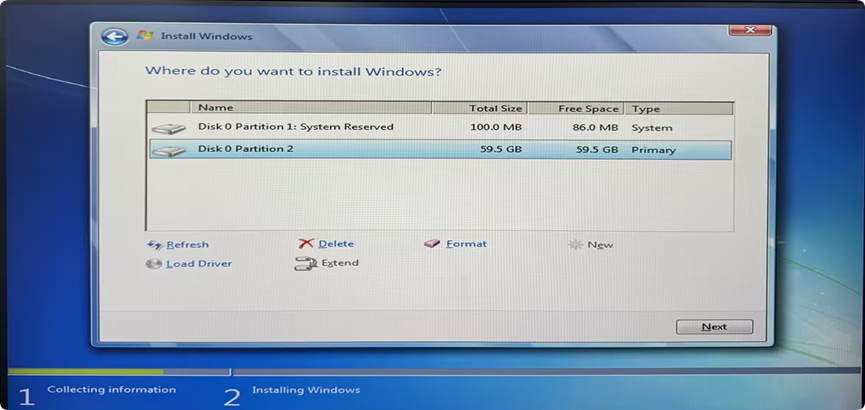
- The interface lists hard drives and existing partitions. If old partitions or legacy OS exist on the disk: select partitions one by one and click Delete until the disk shows "Drive 0 Unallocated Space".
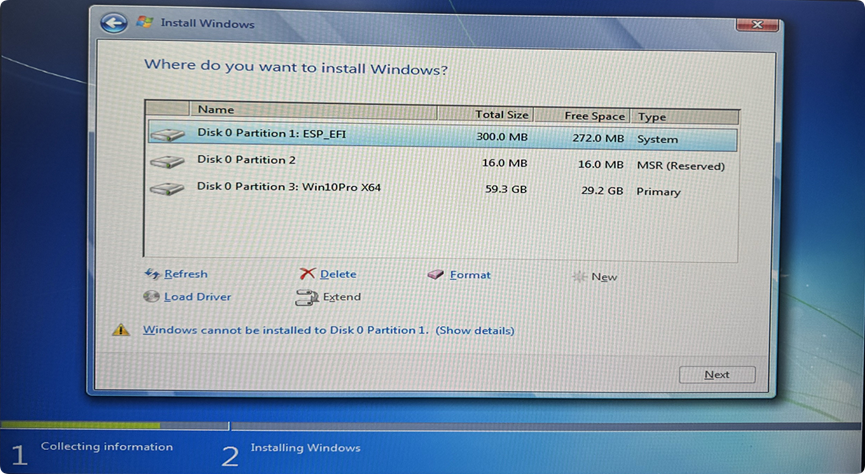
【WARNING: Deleting partitions permanently erases all data on the disk. Double-check that you have selected the correct target disk! If multiple hard drives are installed, identify the correct disk by model and capacity.
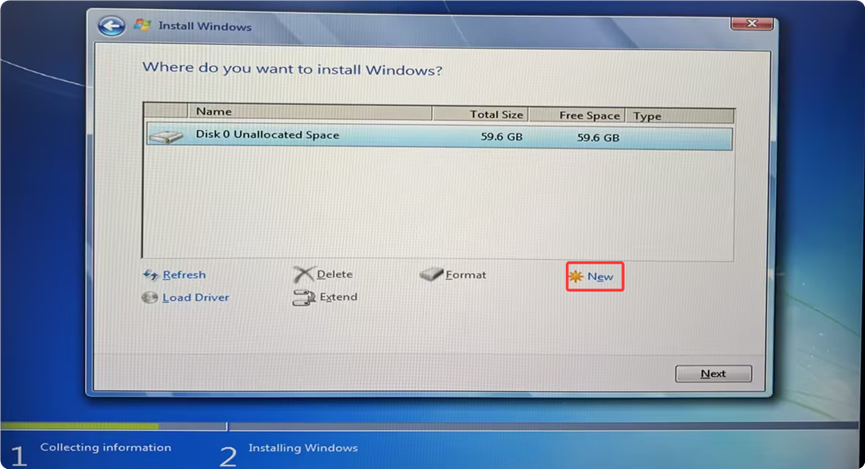
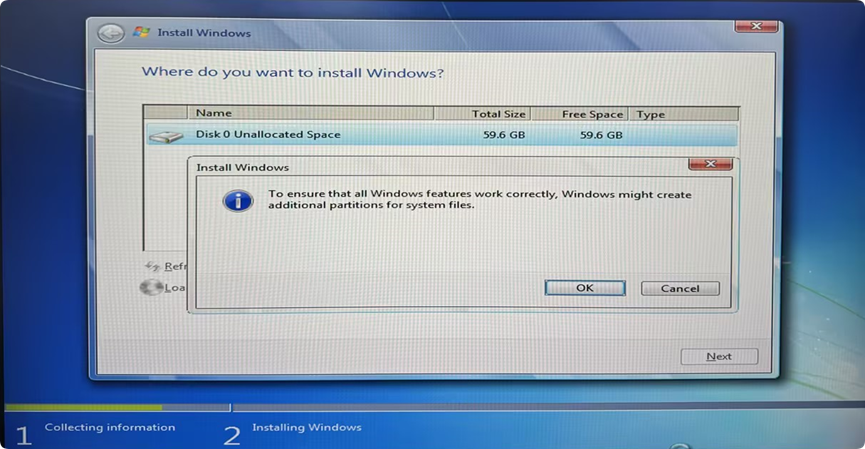
2. Select "Drive 0 Unallocated Space", click "New". Keep the default size and click "Apply". Click "OK" in the confirmation popup. The system will automatically create System Reserved and other required partitions; no manual configuration needed.
3. Select the newly created primary partition and click "Next". File copying will start.
5.5 Wait for Installation Completion
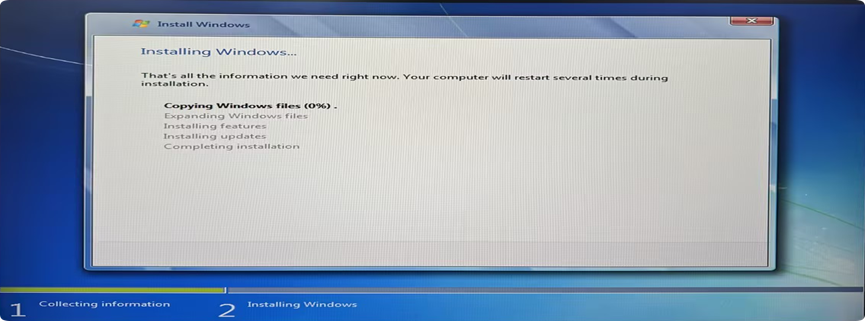
- The screen shows "Installing Windows", proceeding through copying files, installing features and installing updates. Wait 10–20 minutes. The machine will restart automatically several times. This is normal; do not cut power.
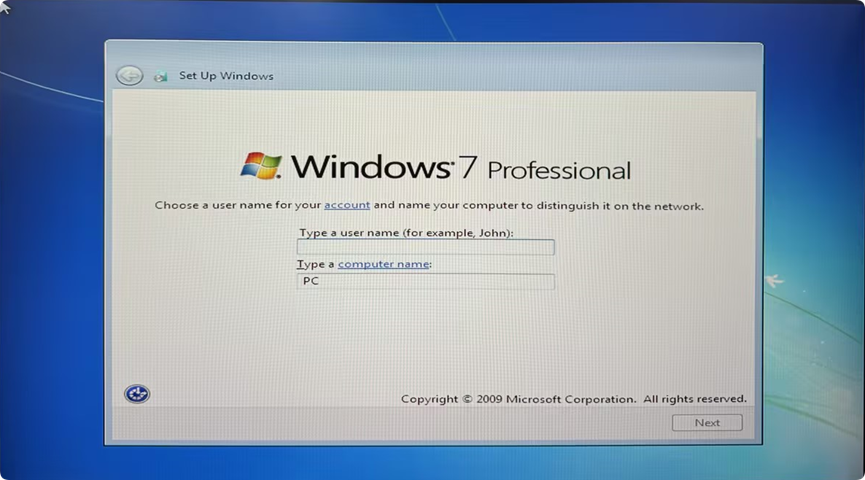
2. After file deployment completes, the computer restarts and enters OOBE configuration page. Input username as required and click "Next".
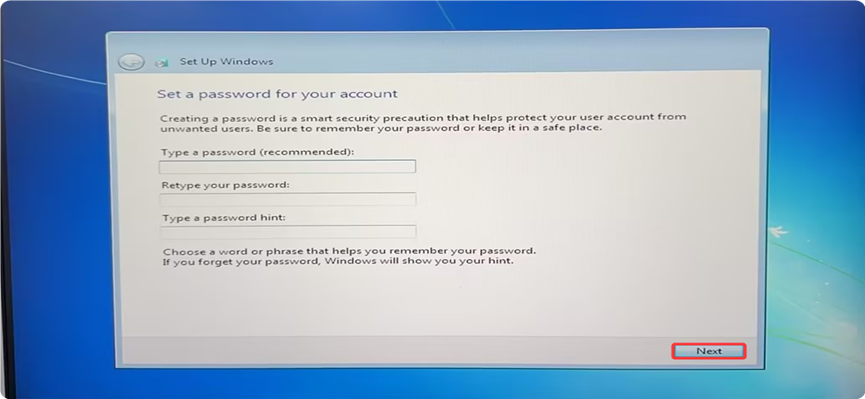
3. Set user password and password hint, then click "Next". You may skip password setup and click "Next" directly.
Note: If you set a password, keep it safely!
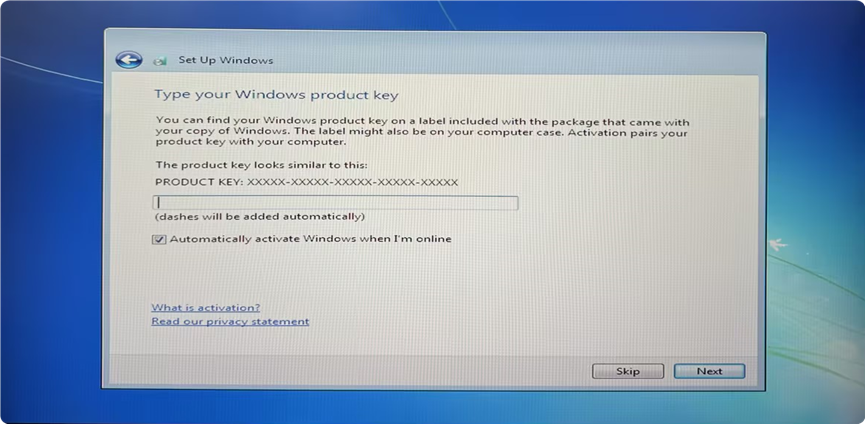
4.Enter product key. If you do not have a product key, click "Skip".
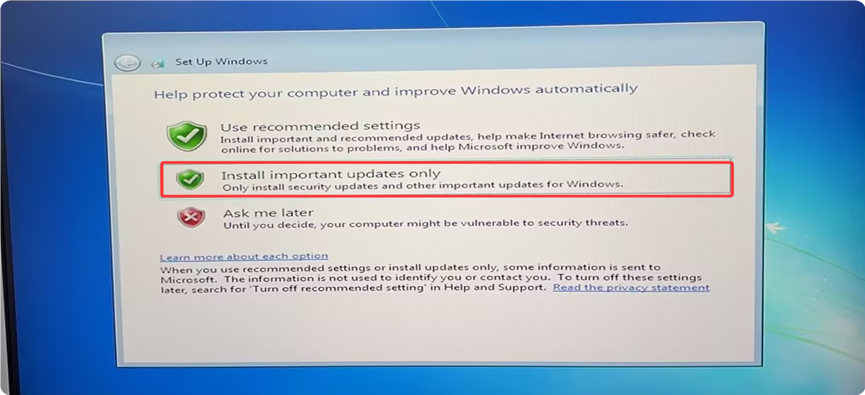
5.Select "Install important updates only".
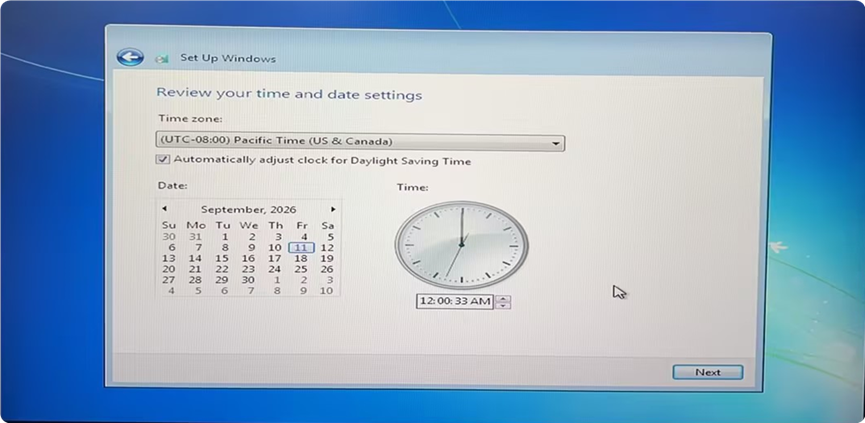
6.Verify time zone, date and time are correct, then click "Next".
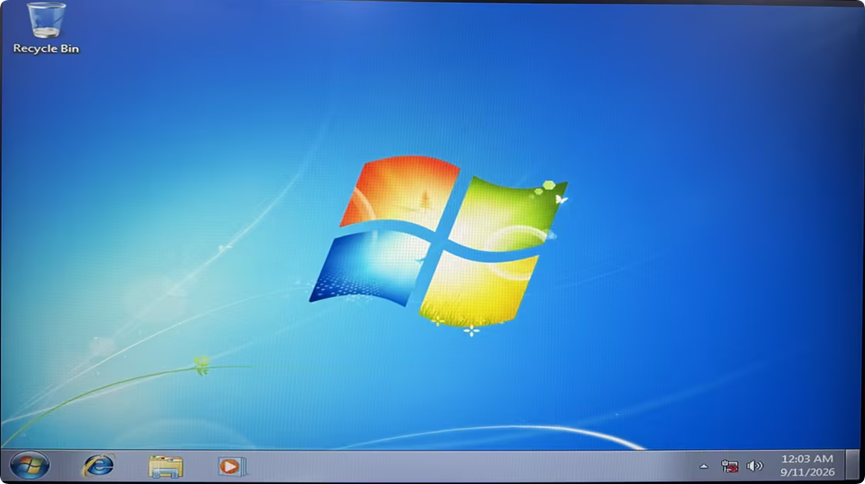
Once configuration is finished, you will enter the system desktop.
6. Step 4: Install Drivers
6.1 Open Device Manager
- Type "Device Manager" in the taskbar search box and press Enter to open it.
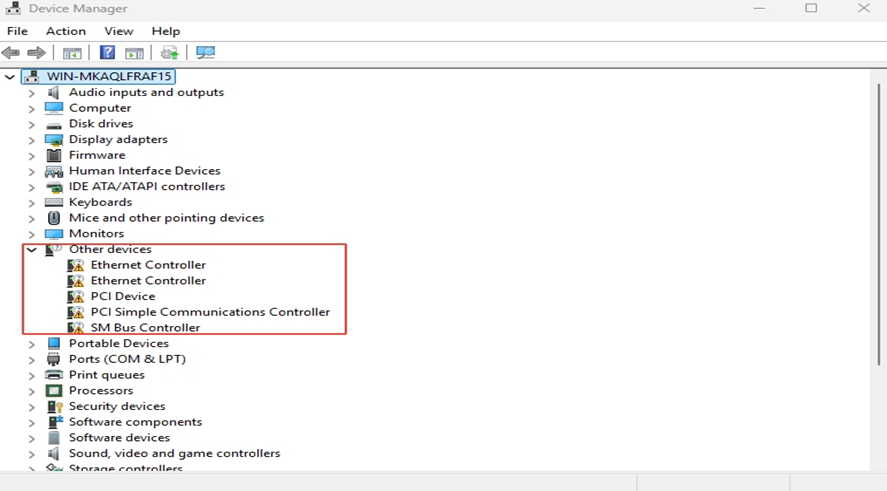
- Check for devices marked with yellow exclamation marks, or unidentified devices under "Other devices". A freshly installed system usually lacks network, graphics and chipset drivers.
6.2 Driver Installation Methods
- Obtain driver packages or download links from your device/host supplier support.
- Double-click the driver installer (.exe) provided by support and follow the wizard to click "Next" to complete installation.
Notice: Install network adapter driver first. Without a working network driver, you cannot download remaining drivers online. If internet access fails after full driver installation, verify the network adapter driver first.
7. Step 5: Activate System
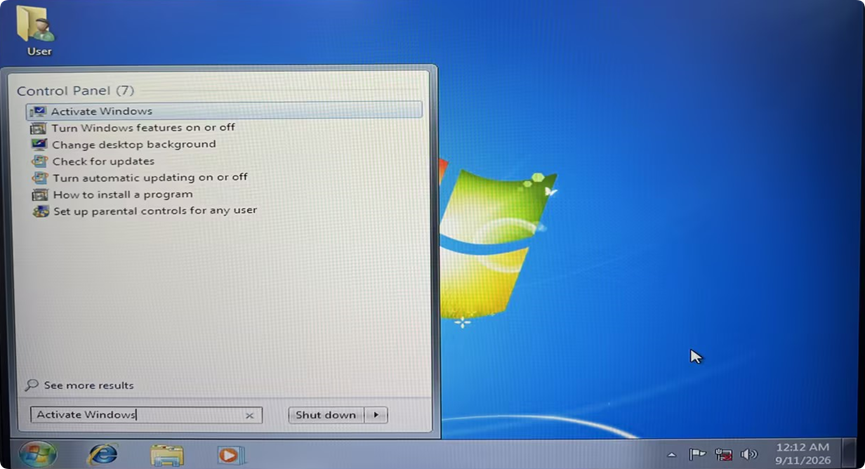
- Ensure the host has network access. Click Start Menu, type "Activate Windows" in the search bar and open the activation entry.
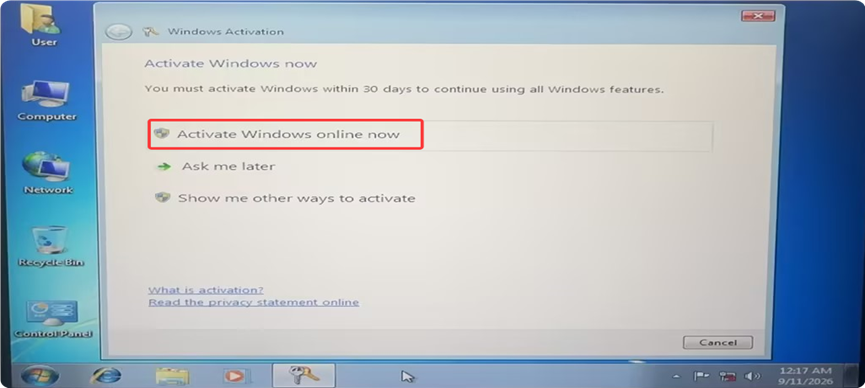
2 .Click "Activate Windows online now".
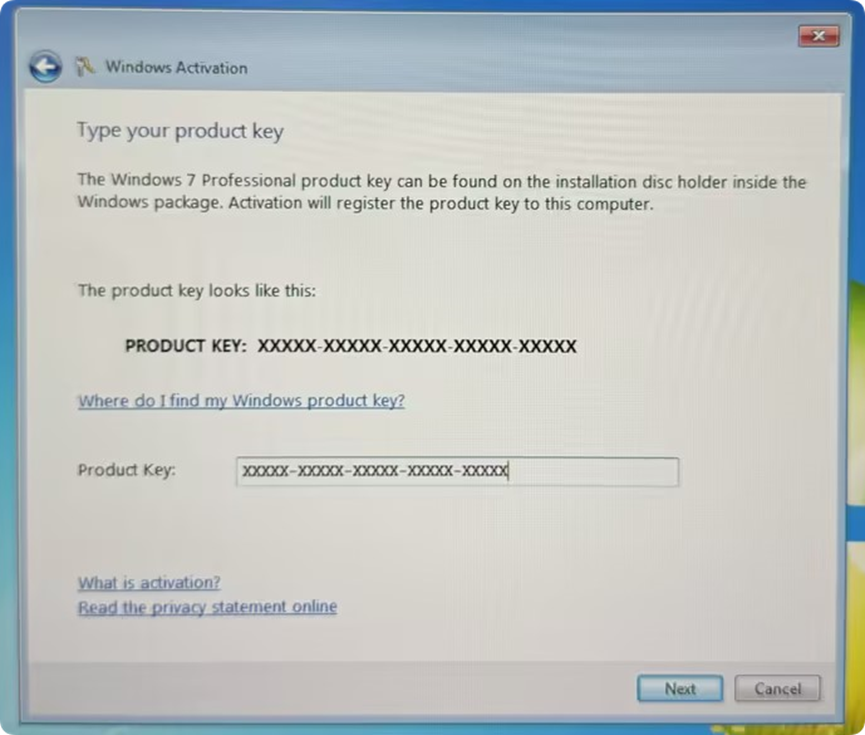
3. Input your activation key and click "Next".
4. When the message "The product has been activated successfully" appears, activation is complete. A system restart is recommended.
Notice: Obtain product keys only through official Microsoft channels or your device supplier, and store them securely.
Windows Server 2025 System Installation Guide
