
Windows Server 2025 System Installation Guide
Guide Overview
This guide is intended for beginner users, demonstrating the full process of installing Windows Server 2025 (Standard · Desktop Experience) on a HYSTOU Mini PC host. It covers downloading the ISO image and Rufus tool, creating a bootable USB drive, accessing the installation wizard, completing disk partitioning, installing drivers and activating the system.
Overall Workflow: ① Create USB Drive → ② Boot from USB Drive → ③ Install via Wizard → ④ Install Drivers → ⑤ Activate System. The whole process takes approximately 40–60 minutes (excluding image download time). Installation will erase all data on the target disk. Please back up data before operation.
| Item | Description |
|---|---|
| Installation Target | Windows Server 2025 (Standard · Desktop Experience) |
| Preparation | 1 USB flash drive (16 GB or larger), 1 internet-connected computer (for downloading & media creation) |
| Required Tools | Windows Server 2025 system image (ISO), Rufus image writing tool |
| Estimated Time | About 40–60 minutes (excluding image download time) |
| Document Version | V1.0 (2026-09) |
1. Pre-Installation Notes
1.1 Who this guide is for
- Beginner users who have never installed Windows Server and want to deploy a server OS on their host.
- Prerequisite: You already have a working target host, plus a separate computer for downloading and creating the bootable media.
- This guide follows 5 sequential steps: download image → create USB drive → install OS → install drivers → activate system. Follow the steps in order.
Notice: This guide assumes you are installing on a brand-new host, or all data on the old host has been backed up. If there are important files on the host disk, back them up first before proceeding!
1.2 Understand 3 core concepts
① Bootable USB Drive: Write the system image onto a USB drive, turning it into a bootable "system installation disc". During installation, the host boots from the USB instead of the hard drive. ② Installation erases data: A clean install deletes and rebuilds all selected disk partitions. Confirm no important files remain on the target disk in advance. ③ Difference between Windows Server and consumer Windows: Windows Server is a server operating system. After installation, its desktop appearance is similar to Windows 10/11, but it has no Microsoft Store or entertainment apps by default. Only versions with "Desktop Experience" include a graphical interface.
2. Preparation: Download Image & Tools
2.1 Required Materials
| Material | Quantity | Purpose | Remarks |
|---|---|---|---|
| USB Flash Drive | 1 piece (16 GB or larger) | Create system boot media | Will be formatted during creation; do not store important files. USB 3.0 offers faster writing speed. |
| Internet-connected Computer | 1 piece | Download image and create bootable USB | Windows / macOS supported |
| Windows Server 2025 Image | 1 piece (~5–6 GB) | System installation source | ISO file |
| Rufus Tool | 1 piece (Free) | Write image to USB drive | Portable software, no installation required |
| Target Host | 1 piece | Machine to install the OS | UEFI boot support recommended (devices manufactured in the last decade generally support UEFI) |
2.2 Download Windows Server 2025 System Image
- Open the image download page (copy the link directly to your browser address bar): //massgrave.dev/windows-server-links
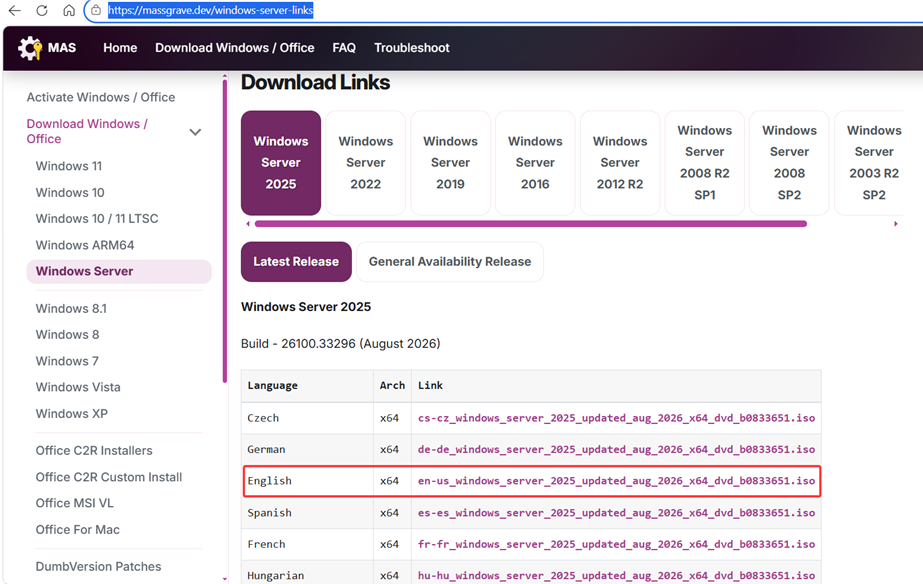
- Locate the Windows Server 2025 download entry on the page and click to go to the download page.
- Select the version and language on the download page, then start downloading and wait for completion (this guide uses "English" as an example).
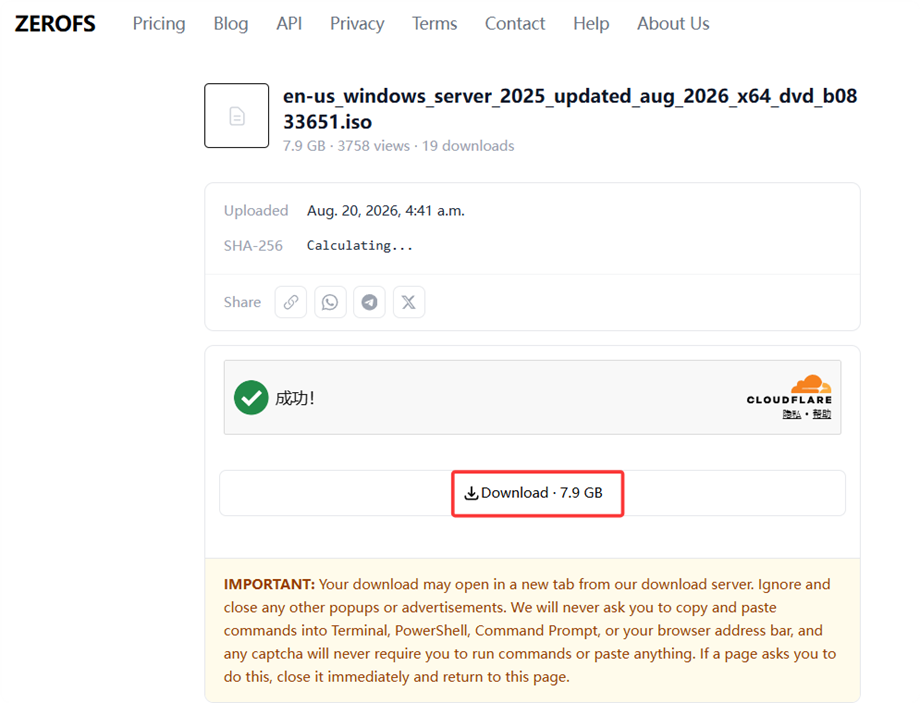
Notice: The ISO file is around 7.9 GB. Verify the file size after download to ensure the file is complete.
2.3 Download Rufus Writing Tool
- Open Rufus official website: //rufus.ie/en
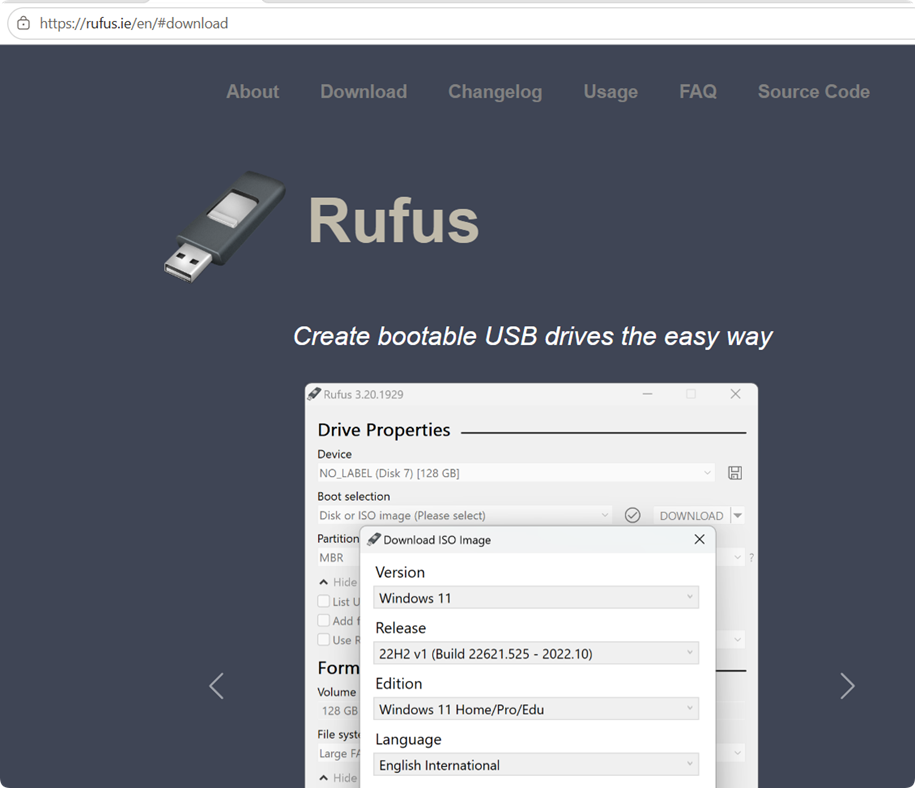
Click the Download button at the top of the page to get the latest Rufus version (e.g. rufus-4.x.exe, free and open-source).
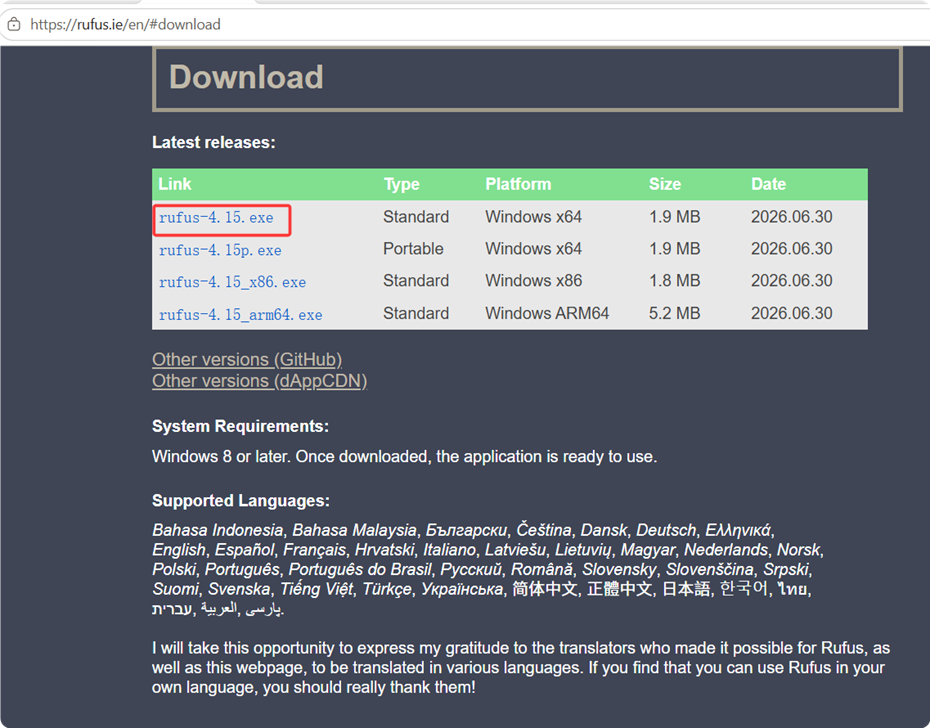
Double-click the downloaded .exe file. Rufus requires no installation; the main interface opens directly.
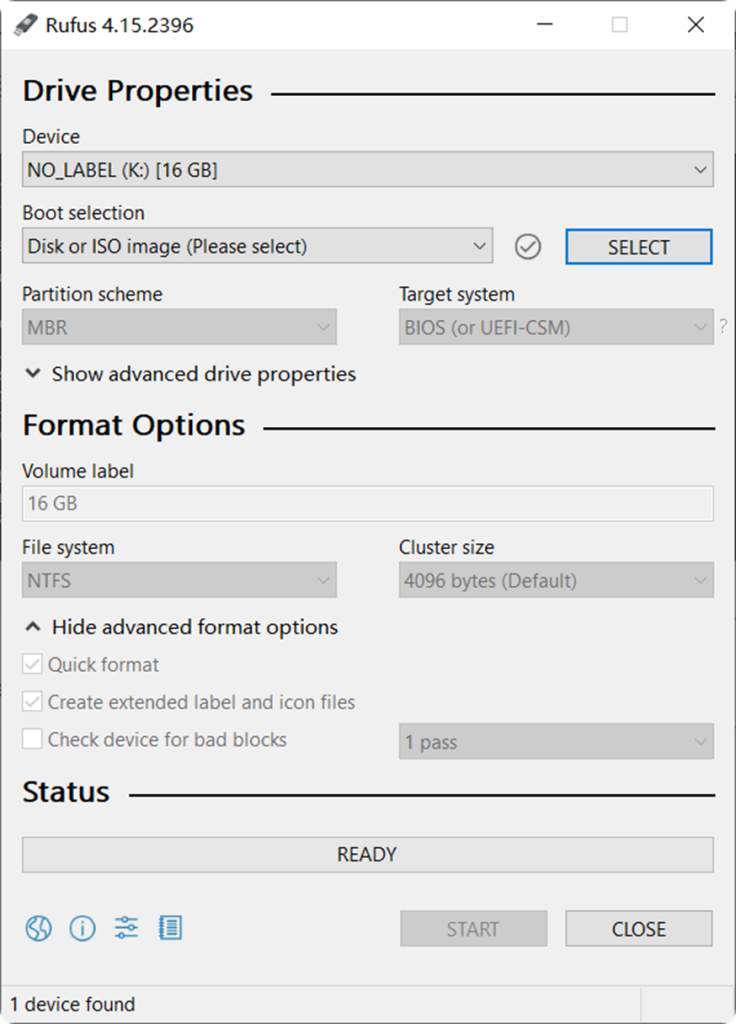
3. Step 1: Create Bootable System USB Drive (Rufus)
WARNING: This step formats the USB drive and deletes all data stored on it. Confirm no important files are saved on the USB before proceeding!
3.1 Select USB Drive and Image
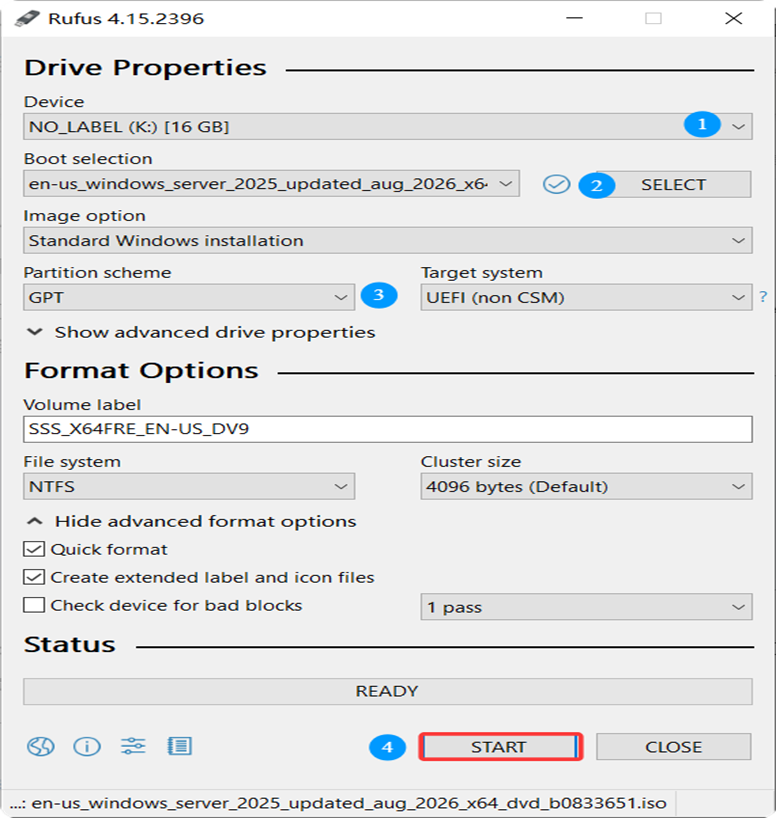
- Plug the USB drive into your computer USB port and launch Rufus.
- In the "Device" dropdown box, select your USB drive (identify it by capacity and drive letter, do not select the wrong device).
- On the right side of "Boot selection", click "Select" and pick the downloaded windows_server_2025.iso image file. After selection, Rufus will auto-recognize and display Windows Server 2025.
3.2 Confirm Writing and Wait for Completion
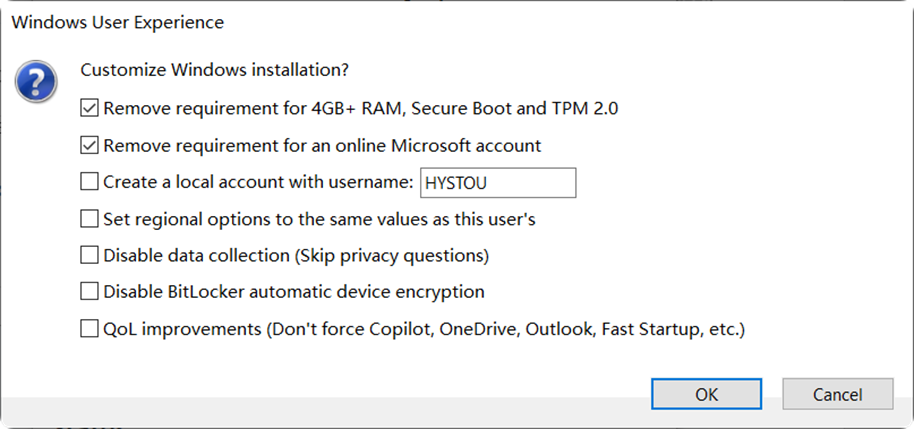
- When the "Windows User Experience" prompt pops up, check the 1st and 2nd options; select other optional items as needed.
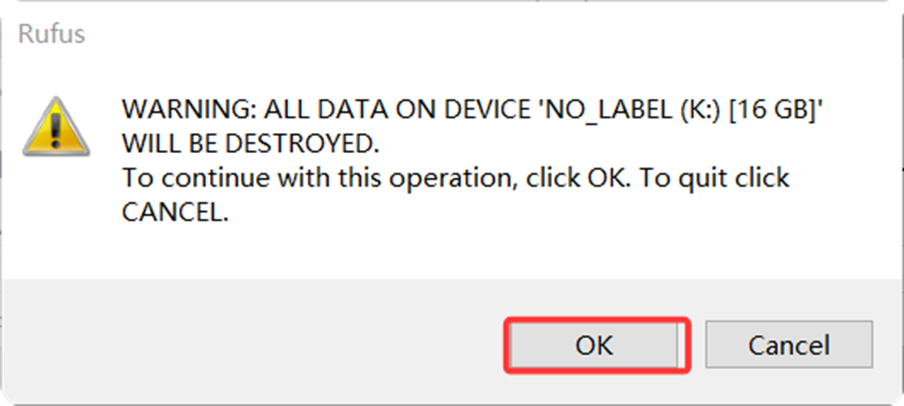
2.When the warning "All data on the USB will be destroyed" appears, click "OK".
3.Wait for the progress bar to finish, changing colour from orange to green. When status shows "READY", writing is completed.
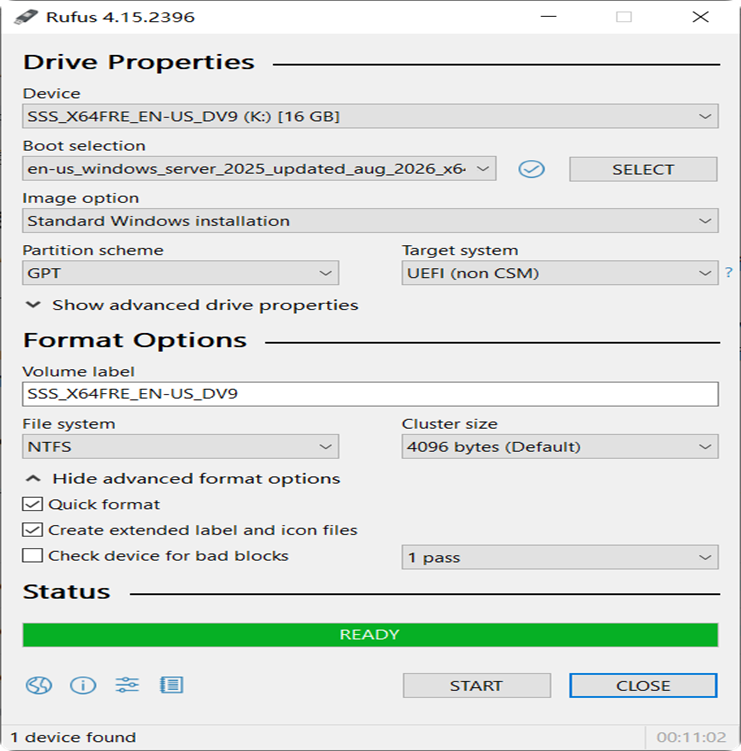
4. Safely eject the USB drive via the "Safely remove hardware" icon on the system taskbar. The bootable USB is now ready.
Notice: The visible capacity of the USB drive will shrink after creation. This is normal and confirms the image has been written successfully. To restore the USB as a regular storage drive later, reformat it in Disk Management.
4. Step 2: Boot from USB and Enter Installation Interface
4.1 Insert USB and Press Hotkey to Open Boot Menu
- Plug the newly created bootable USB into the target host USB port (rear USB ports on the host are recommended for better compatibility).
- Power on the host. Immediately and repeatedly tap F11 / F7 on the keyboard (tap continuously, do not hold down).
- Stop pressing keys once the Boot Menu appears. If the machine boots directly into an OS or shows a black screen, the timing was missed. Reboot and try again quickly.
4.2 Select USB Drive in Boot Menu
- In the Boot Menu, use the up/down arrow keys to locate the USB option prefixed with "UEFI:", for example: UEFI: USB DISK 2.0 PMAP / UEFI: SanDisk 16GB
- Select the UEFI entry and press Enter. The host will boot from the USB drive.
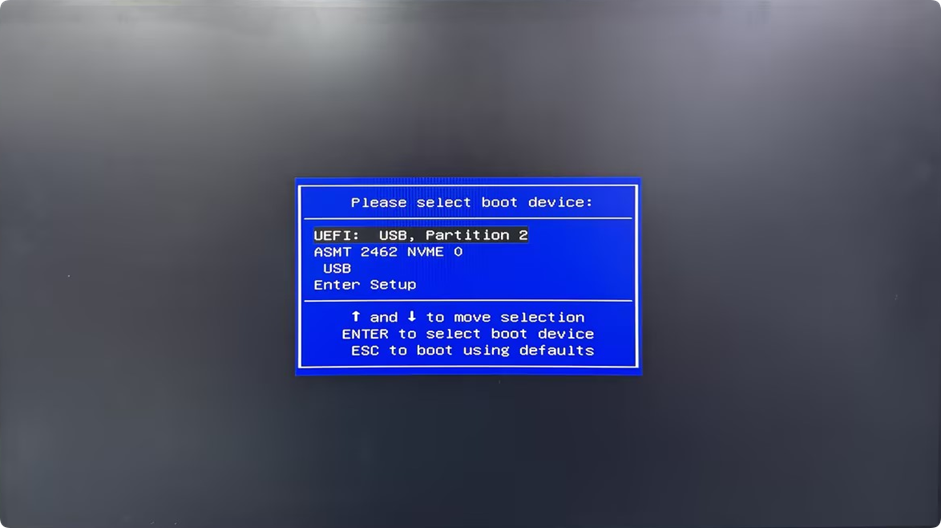
3. Shortly after, the blue "Windows Setup" loading screen will appear. This means boot success and you can proceed to the installation step.
Notice: Always select the option starting with "UEFI:" (matches the GFI boot written by Rufus). If there are only non-UEFI entries in the list, installation usually fails. Refer to Chapter 8 FAQ for troubleshooting.
5. Step 3: Install OS via Wizard
5.1 Language Settings and Start Installation
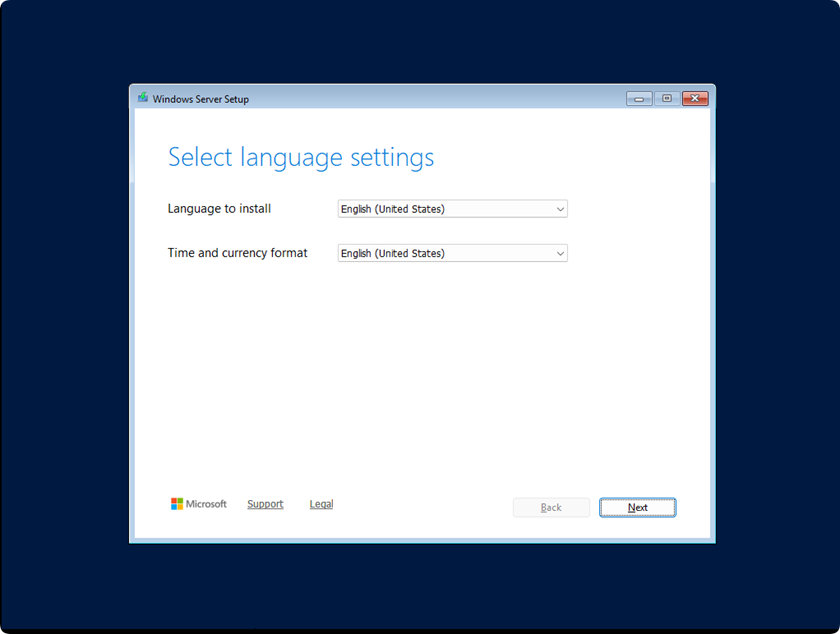
- On the welcome screen of Windows Setup, leave language, time and keyboard input method as default "English", then click "Next".
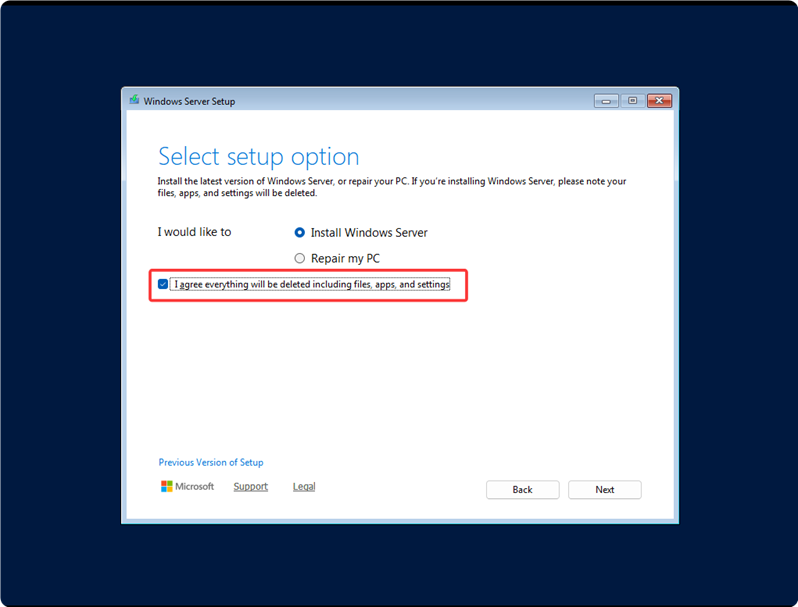
2. Tick "I Agree everything will be deleted including files, apps, and settings", then click "Next".
5.2 Product Key & Version Selection (Important)
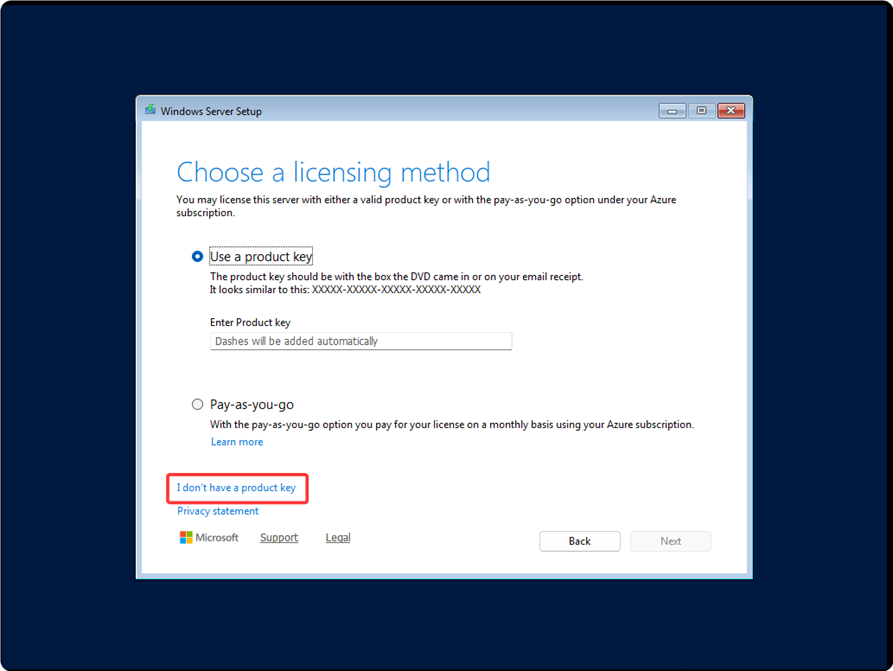
- If the "Enter product key" screen appears: enter your key if available and click Next. If you do not have a key, click "I don't have a product key" to activate later (evaluation ISOs usually skip this step).
2. On the OS version list, choose the target version:
- Windows Server 2025 Standard (Desktop Experience) — Recommended for most small business and single-server scenarios.
- Windows Server 2025 Datacenter (Desktop Experience) — For large-scale virtualization and hyper-converged scenarios.
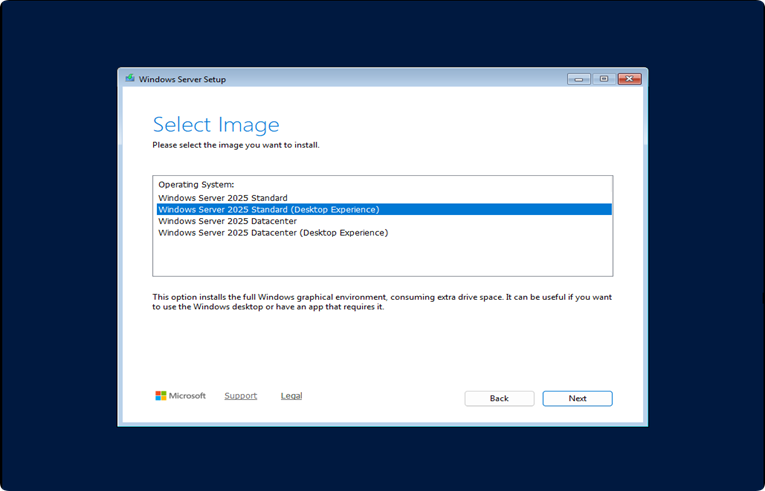
Notice: Make sure you select the version labelled with "(Desktop Experience)"! Versions without this suffix are Server Core, which only have a command line interface with no graphical desktop and are not suitable for beginners.
5.3 Accept License Terms
Accept the license terms and continue.
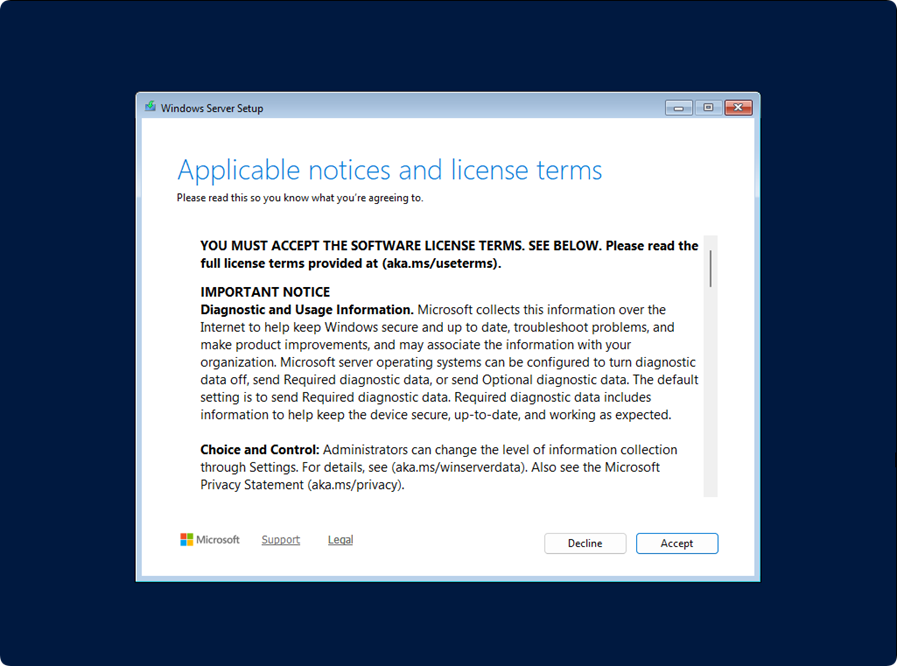
5.4 Disk Partitioning (Critical Step)
- The interface lists hard drives and existing partitions. If old partitions or legacy OS exist on the disk: select partitions one by one and click Delete until the disk shows "Drive 0 Unallocated Space".
WARNING: Deleting partitions permanently erases all data on the disk. Double-check that you have selected the correct target disk! If multiple hard drives are installed, identify the correct disk by model and capacity.
- Select "Drive 0 Unallocated Space", click "New". Keep the default size and click "Apply". Click "OK" in the confirmation popup. The system will automatically create recovery, MSR and other required partitions; no manual configuration needed.
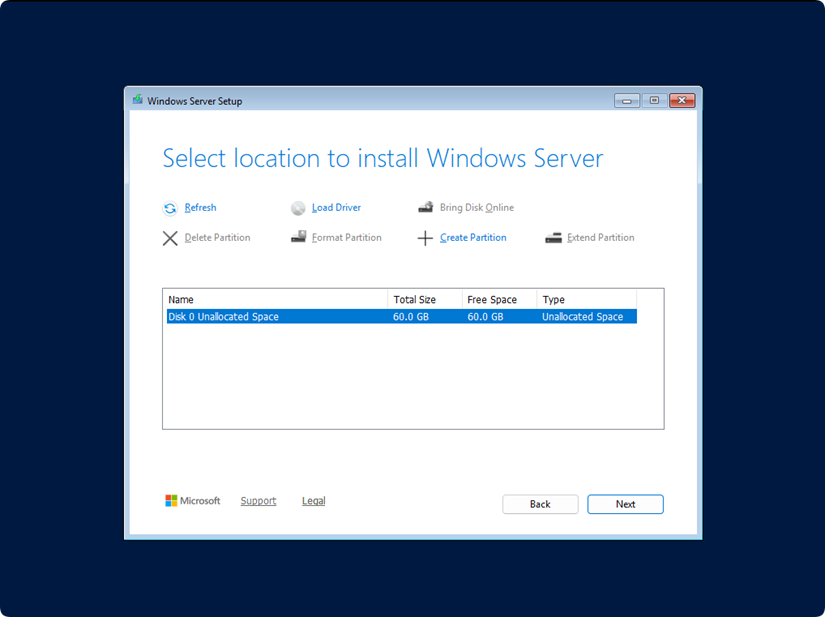
3. Select the newly created primary partition and click "Next". File copying will start.
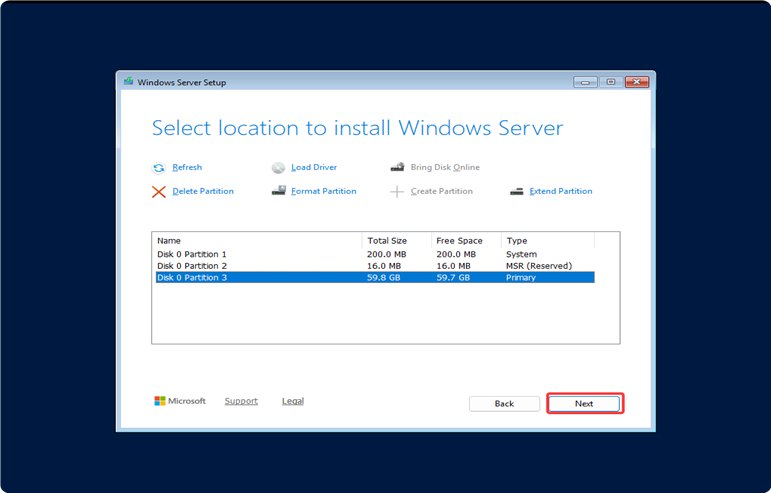
Notice: If the hard drive cannot be seen in the disk list or you receive the error "Windows cannot be installed to this disk", this is usually caused by missing storage controller drivers or mismatched partition table. See Chapter 8 FAQ-Q3 for solutions.
5.5 Wait for Installation Completion
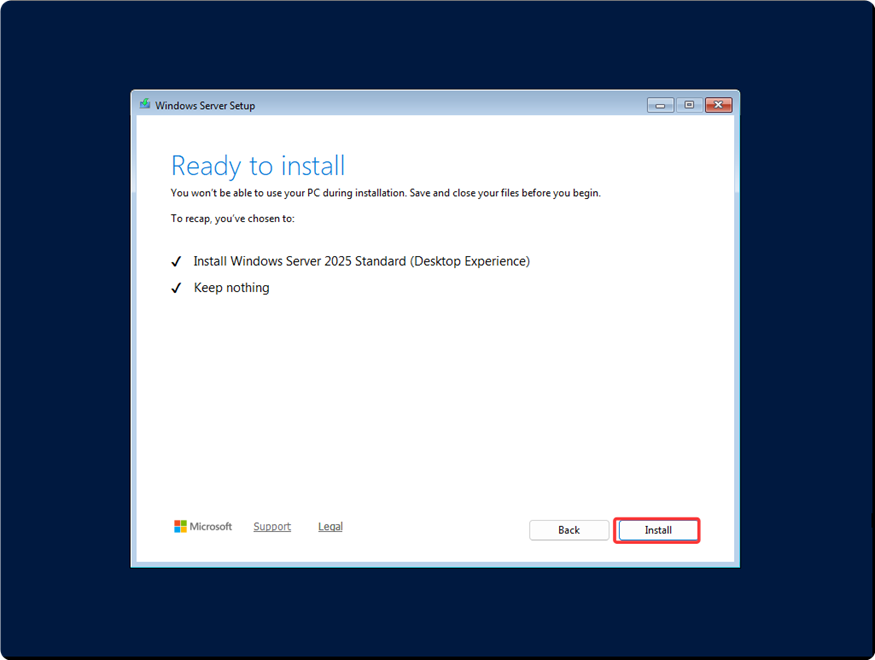
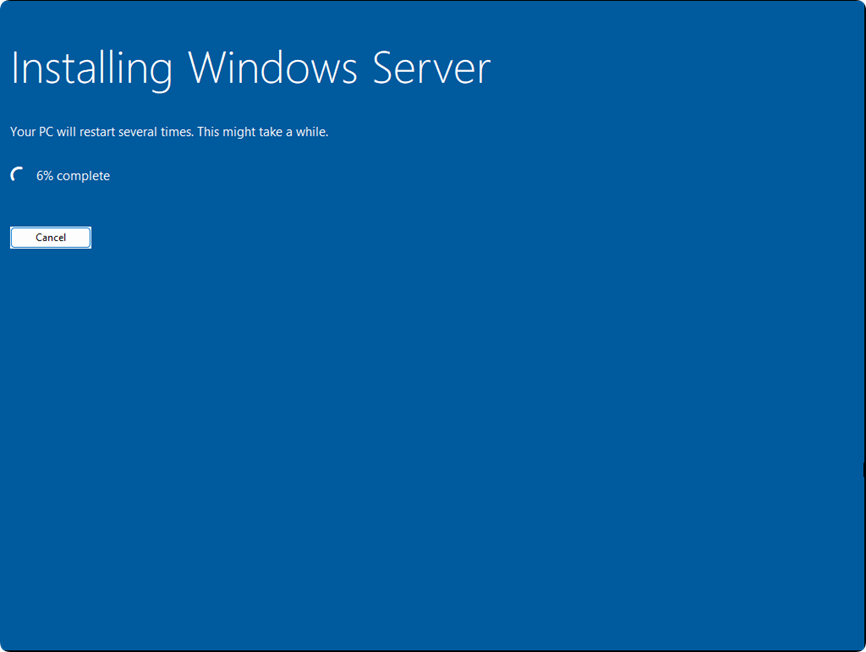
- The screen shows "Installing Windows", proceeding through copying files, installing features and installing updates. Wait 10–30 minutes. The machine will restart automatically several times. This is normal; do not cut power.
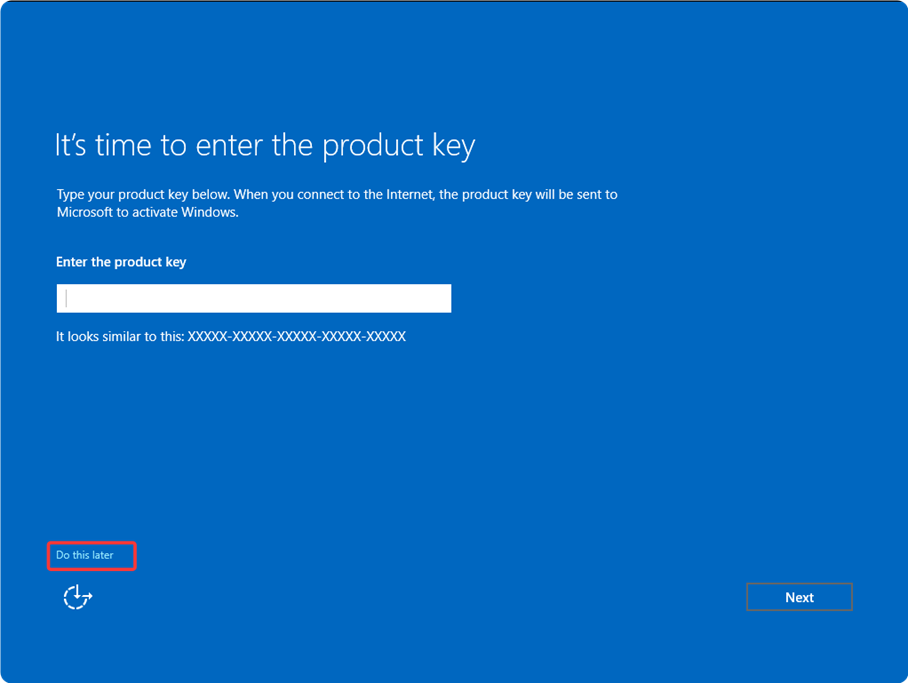
2. After file deployment completes, the computer restarts and enters OOBE configuration page. If prompted for product key: input your key if available, otherwise click "Do this later".
3. Configure administrator password. Password requirements:
| Item | Requirement |
|---|---|
| Length | At least 7 characters (some UI prompts show "strong password") |
| Complexity | Must satisfy 3 out of the following 4 categories: uppercase A–Z, lowercase a–z, numbers 0–9, special symbols (!@#$%^&*, etc.) |
| Blank | Cannot be empty |
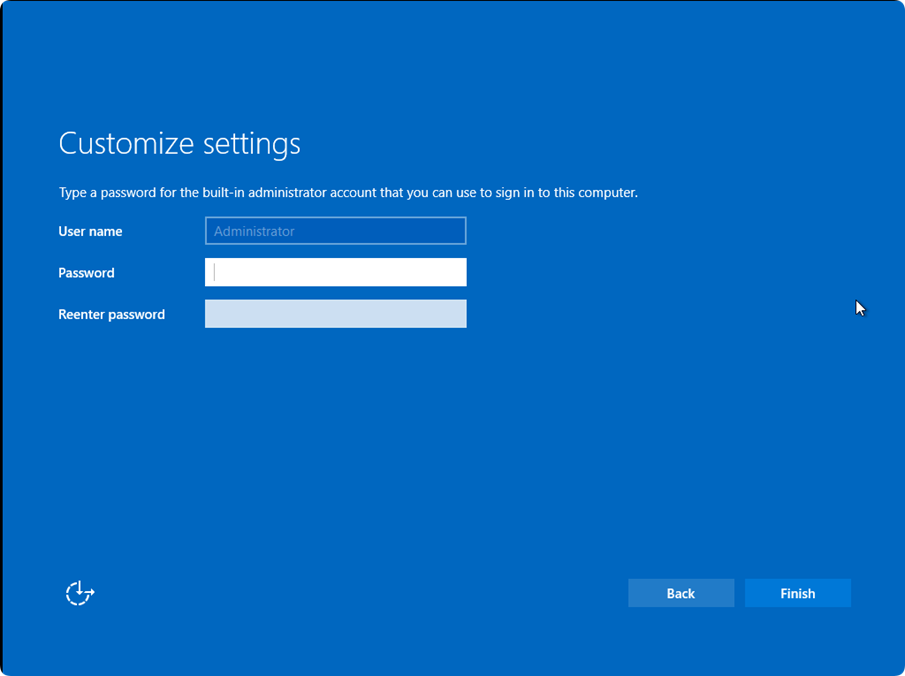
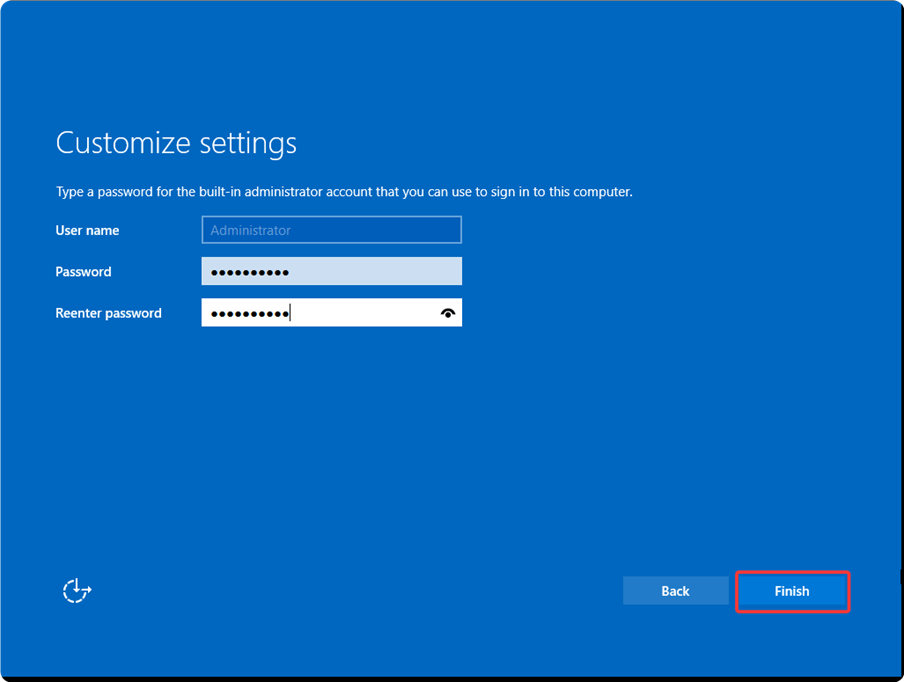
5.6 First System Login
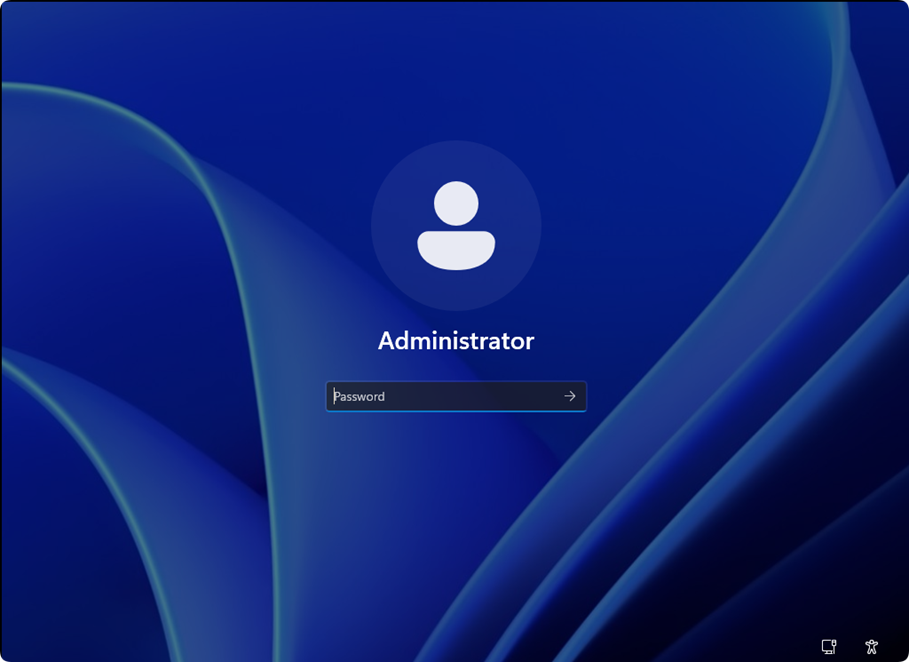
- When the system prompts you to press Ctrl+Alt+Delete, press Ctrl, Alt and Delete keys simultaneously.
- At first login, enter the Administrator password. Please keep it safe (password recovery is complicated once lost).
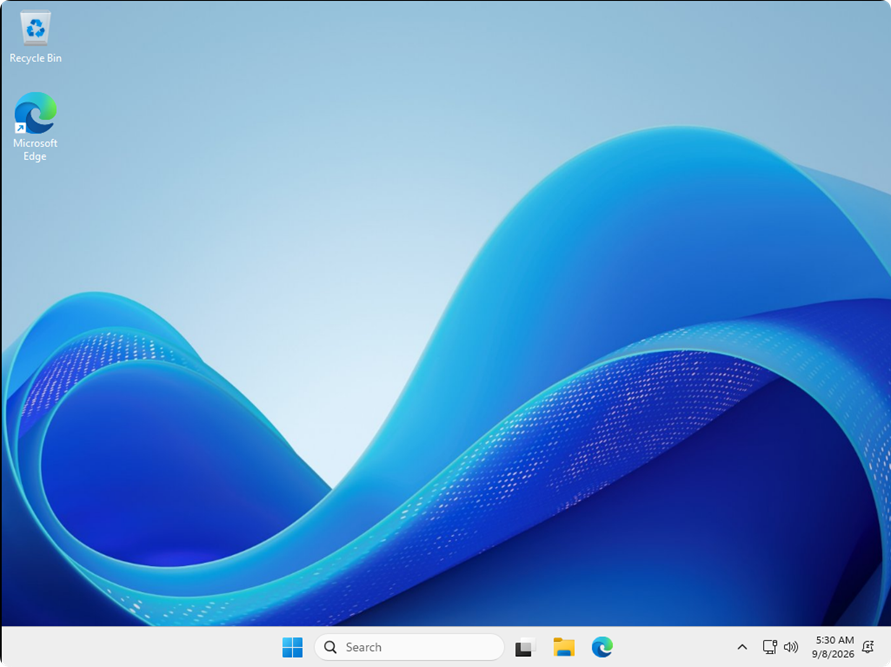
3. Enter the password to access the system desktop.
6. Step 4: Install Drivers
6.1 Open Device Manager
- Type "Device Manager" in the taskbar search box and press Enter; or right-click the Start button → "Device Manager".
- Check for devices marked with yellow exclamation marks, or unidentified devices under "Other devices". A freshly installed system usually lacks network, graphics and chipset drivers.
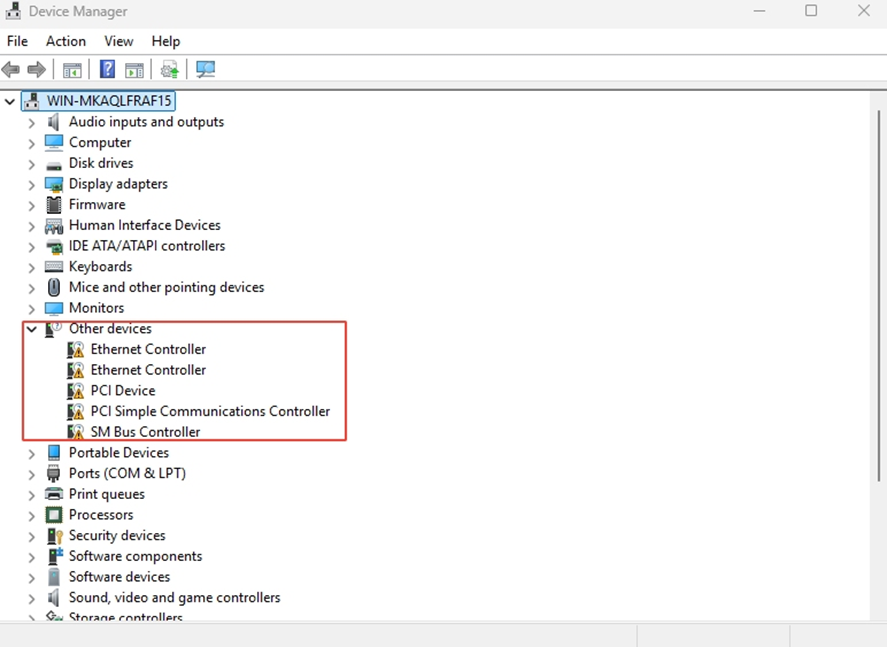
6.2 Driver Installation Methods
- Obtain driver packages or download links from your device/host supplier support.
- Method A (Recommended): Double-click the driver installer (.exe) provided by support and follow the wizard to click "Next" to complete installation.
- Method B (for extracted driver folders): Right-click the device with yellow exclamation mark → "Update driver" → "Browse my computer for drivers" → navigate to the driver folder → click "Next" and wait for installation.
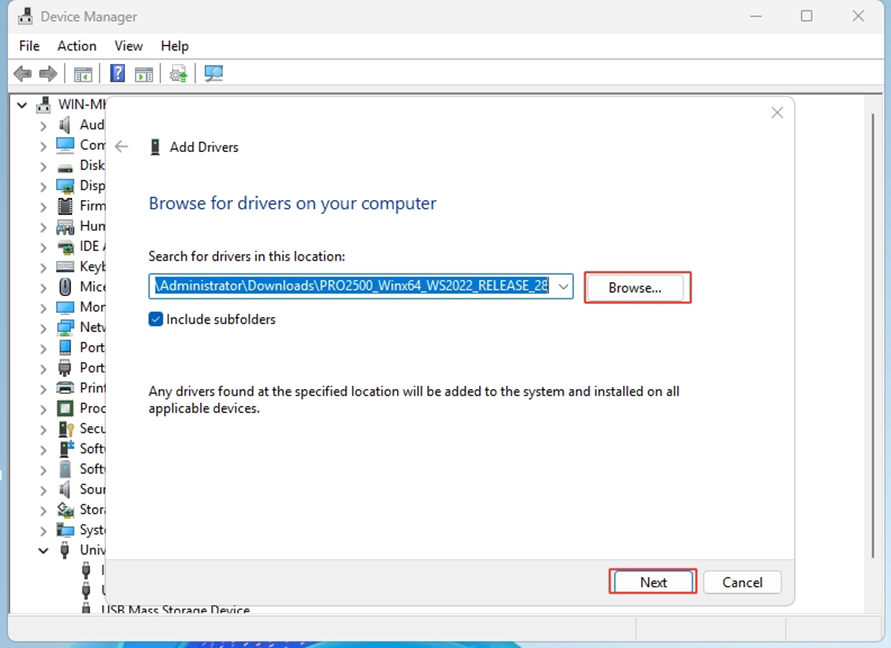
4. Repeat the above steps until no yellow exclamation marks remain in Device Manager, meaning all drivers are installed.
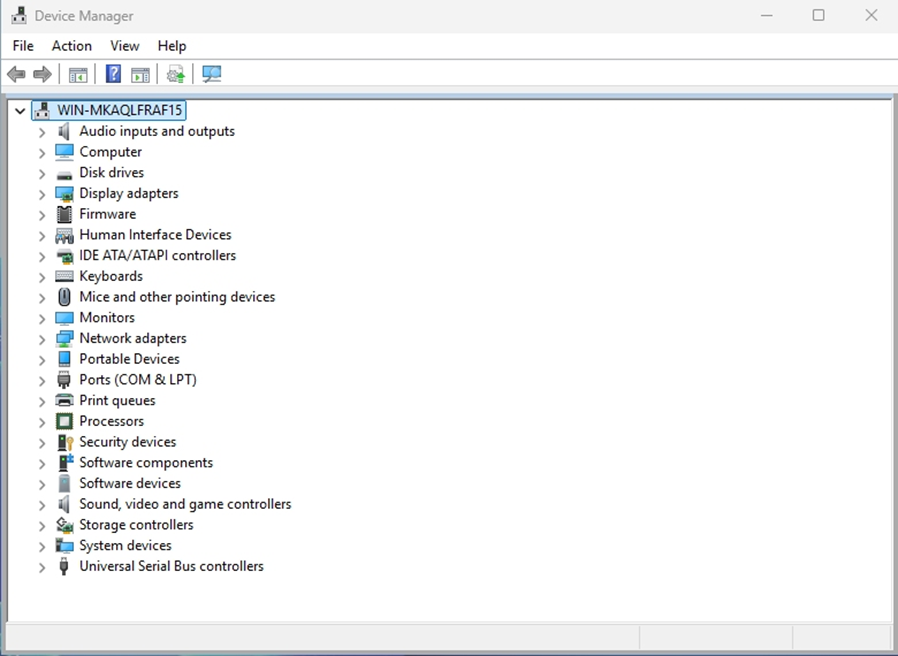
Notice: Install network adapter driver first. Without a working network driver, you cannot download remaining drivers online. If internet access fails after full driver installation, verify the network adapter driver first.
7. Step 5: Activate System
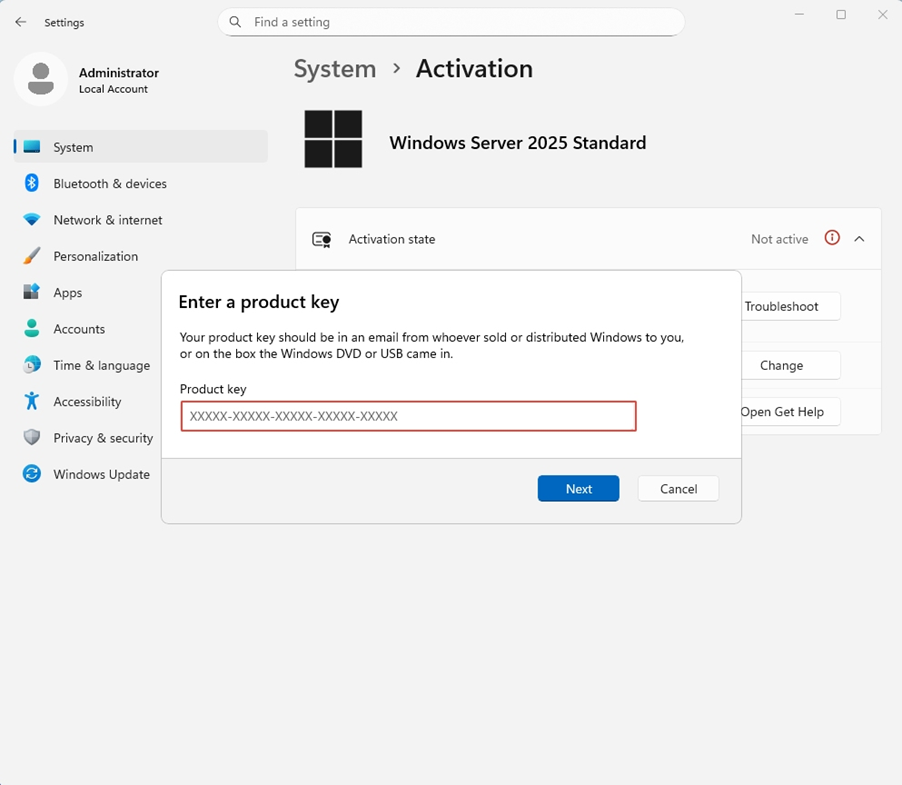
- Open activation settings: Click Start Menu → Settings (gear icon) → System → Activation. If the Activation entry is missing, use the command-line method below.
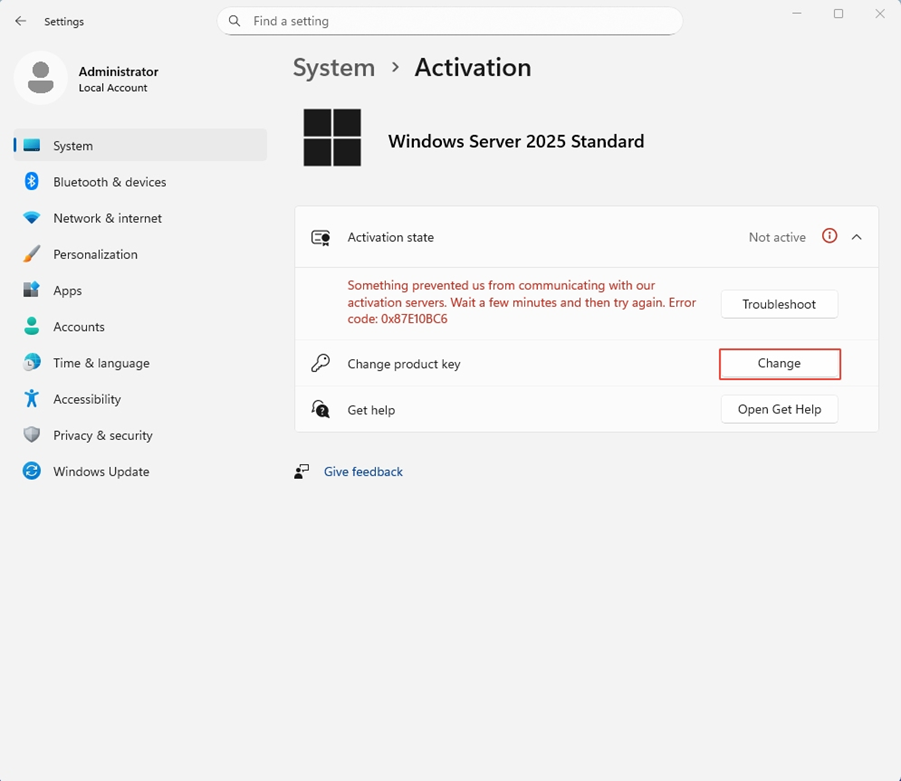
2. Method A (GUI operation): Click "Change product key", input the legitimate product key provided by support, then click "Next" to finish activation.
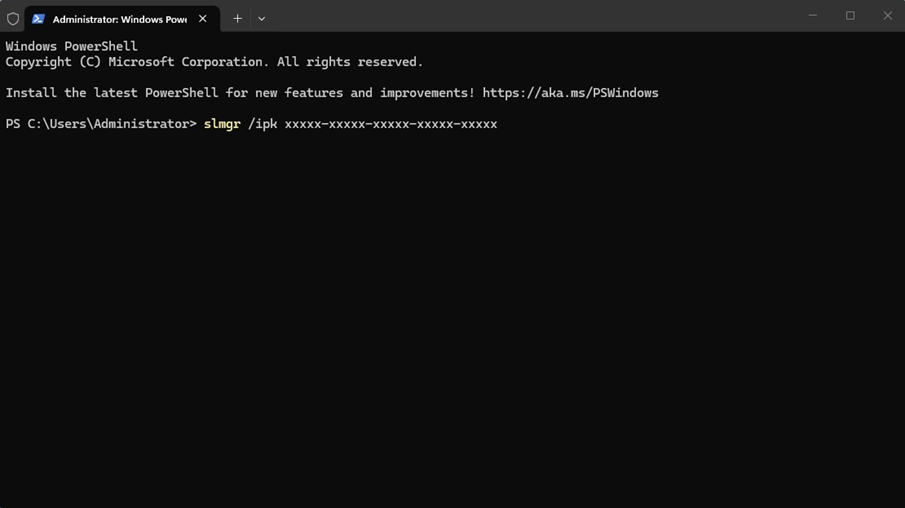
3. Method B (Command line, more stable): Right-click Start → Terminal (Admin) or Windows PowerShell (Admin). Run the two commands sequentially and press Enter after each line:
slmgr /ipk YOUR-PRODUCT-KEY
slmgr /at
Example: slmgr /ipk XXXXX-XXXXX-XXXXX-XXXXX-XXXXX
4.
When the message "The product has been activated successfully" appears, activation is complete. A system restart is recommended.
Notice: Obtain product keys only through official Microsoft channels or your device supplier, and store them securely. Refer to Chapter 8 FAQ-Q5 for common activation error codes.
8. Frequently Asked Questions (FAQ)
Q1: Pressing F11 has no response, cannot open boot menu?
① Start tapping the key immediately at power-on, preferably before the brand logo appears. ② Different host models use different hotkeys. ③ Some motherboards require the boot menu hotkey function to be enabled inside BIOS. ④ If still unsuccessful, enter BIOS and set the USB drive as the first boot device, save and exit (usually F10 to save).
Q2: USB drive / UEFI option missing in boot menu?
① Confirm the USB is properly inserted and boot media created successfully. Try another USB port. ② Reboot and re-enter boot menu with correct timing. ③ Enter BIOS and disable Secure Boot then retry. ④ Confirm the USB was created with GPT + UEFI mode; re-create with Rufus if needed.
Q3: Error "Windows cannot be installed to this disk" or drive not detected?
① Confirm the boot USB uses UEFI/GPT boot (Rufus default setting). ② For Intel VMD / RAID or undetected NVMe hard drives, click "Load driver" and load the storage controller driver provided by your supplier. ③ Some older hosts require switching BIOS to Legacy (CSM) mode and retry.
Q4: After installation only command line shows, no desktop?
You selected Server Core version (no Desktop Experience). Reinstall the OS. At step 5.2 version selection, make sure you pick the option containing "(Desktop Experience)".
Q5: Error code appears during activation?
Common codes: 0xC004F074 / 0xC004C003. Usually caused by invalid key or failed connection to Microsoft activation server: ① Double-check key input and confirm the key matches your OS version (Standard key cannot activate Datacenter). ② Verify network connectivity to Microsoft activation servers. ③ If issues persist, contact your supplier support.
Q6: System keeps prompting "Press any key to boot from CD or DVD"?
The host is still booting from USB. Do not press any key when the prompt appears, or remove the USB drive and reboot to boot from hard disk.
Q7: Forgot Administrator password?
Contact your device/system supplier support to follow official reset procedures (installation media is normally required for password reset). We recommend saving your password after setup.
Windows 7 Installation Guide
Build a RAID 1 mirrored array using Intel VMD technology
